
After completing the first quest in The Kitsune questline, Blood in the Snow, the followup quest The Way of the Shamisen will start back at the Red Crane Inn. This page will provide a walkthrough for this quest with a focus on the puzzles you’ll need to solve to get closer to rooting out The Kitsune in Ghost of Yotei!
Page Breakdown
| Quick Search |
|---|
| Search Commander Fujita’s Room |
| Get Intel from Chosuke |
| Black Dye House Puzzle |
| Pit-Rope Puzzle |
| Dead End Puzzle |
| Cavern Building Puzzle |

Search Commander Fujita’s room for clues,

then get info out of his informant, Chosuke.
Search Commander Fujita’s Room
Return to the Red Crane Inn and talk to Oyuki to get the quest started properly, then follow her upstairs, enter the hidden passage and eavesdrop on Commander Fujita. After Oyuki leaves, wait for more chatter to end then infiltrate Commander Fujita’s room and read the various letters out in the open until Oyuki shows up, then follow her out of the room and the inn. Almost seems like we didn’t really need to do any of this sneaking around business at all.
Get Intel from Chosuke
Mount up and follow Oyuki to the Nakajima Sake House, then head inside for some scenes. You’ll need to play a note on your shamisen, eavesdrop on the patrons, and once you’ve gained the intel you need to head upstairs and talk to Chosuke. Pick various bottles of sake until you get the right one to trigger a scene, follow Chosuke outside for another scene, then ride with Oyuki to the Black Dye House.

Black Dye House Puzzle
After all that, we’re finally where things get interesting… at least from a guide perspective. Head into the smaller building uphill to find three wooden platforms on the ground, each with a symbol on it. The platform to the left has the “left” symbol 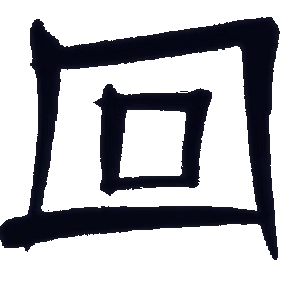 on it and an arrow pointing towards the door, the one to the right has the “right” symbol
 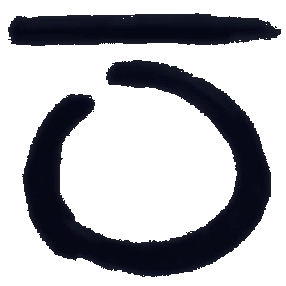 on it and an arrow pointing to the left, and the one in the middle has the “engage” symbol
 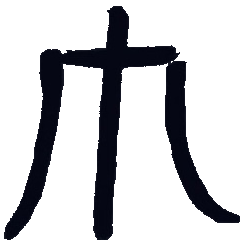 on it. Opposite where you entered are two pedestals with the same symbols on them, and to the left are two fox statues. Take the fox statue furthest from the door and place it on the left pedestal, then place the fox statue closer to the door and put it on the right pedestal. Next rotate the left platform until the arrow is pointing left and the right platform until the arrow is pointing left, then interact with the middle platform to reveal a hidden passage.

Pit-Rope Puzzle
In the tunnels below the dye house, follow a linear passage to trigger a scene, assassinate two guards, free the dye merchant and after some chatter loot the cells. Once done, find a fox statue near a chasm with the “right” symbol on it and rotate it to face right to deploy a rope, allowing you to cross the pit.
Dead End Puzzle
Jump your way deeper into the tunnel and you’ll reach a fork in the road, a passage to the right is marked with the “death” symbol 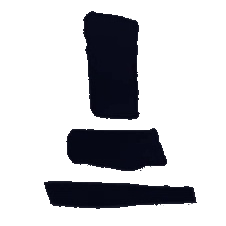 , so instead squeeze under a boulder to the left marked with a “forward“ symbol
 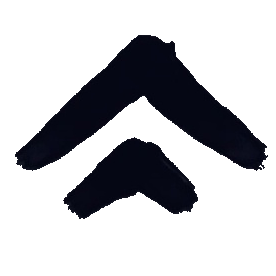 . After crawling under the boulder, continue on until you have to pull down an obstruction with your grapple, then slide through a narrow cleft and when you reach a fork continue forward, ignoring the right passage. Cross a beam over a pit ahead, then turn right and jump and grapple across another pit. Use more platforms to traverse another pit to reach the next puzzle area.

Note the poses of the fox statues near the building,

then find their counterparts in the nearby chamber and note the symbol near them - you need to rotate the statues by the building to match these symbols.
Cavern Building Puzzle
Eventually you’ll drop down a ledge and reach another fork, where if you go left you’ll find a door with the “engage” symbol , to the right are some stairs leading up and between them some ledges you can climb. Climb the ledges and be wary of Nine Nails enemies waiting to ambush you - they are, as of yet, undetectable until they attack.
Search around the area to find the odd fox statue with a symbol near it, Nine Tails waiting to ambush you, cages with poisoned victims inside, and a building at the end of the cavern you can’t open yet. Outside the building are four statues with foxes on pedestals in various poses, each with a symbol on said pedestal. The leftmost one bears the “death” symbol , so ignore it and instead focus on the other three, from left to right:
- A howling fox with its right leg raised.
- A lying down fox.
- A fox standing on all fours.
Throughout the chamber are fox statues matching the ones in the front of the building, and they all have directional symbols on them, indicating how each statue in front of the building must be facing:
- The lying fox statue can be found by turning left from the building nearly 180-degrees, it has the “right” symbol on the wall behind it.
- Facing the building, turn left to find some stairs. Go up them and follow the wall to your right to find the fox statue with one paw raised. The wall behind it has the “right” symbol on it.
- From the building, turn right nearly 180-degrees until you find a passage ahead. Make your way over there to find the standing fox statue near a cell with a yellow light over it. The “left” symbol is on the wall.
Put it all together and you need to rotate the statue as such:
- Sitting fox statue: Death (ignore)
- Paw up fox statue: Right
- Lying fox statue: Right
- Standing fox statue: Left
Get all the statues facing the right way and you’ll be able to enter the building, triggering a scene. Once it ends, head to the tunnel ahead, grapple-pull a wall down, then return to the dye house for another scene, after which this quest will end, and its followup, Poison and Lies will begin.

No Comments