Browse all 1333 Videos

A Natural 20 Led to my Oathbreaker
270.2k views
Baldur's Gate 3

BEST Attributes to Level in Clair Obscur: Expedition 33
241.2k views
Clair Obscur: Expedition 33

Silksong: Which Route to Take – Blasted Steps or Sinner’s Road?
214.4k views
Hollow Knight: Silksong

ALL Ga Ko and Kerotan Locations in MGS Delta
209.0k views
Metal Gear Solid Delta: Snake Eater

How to Open the Nornir Chest in the Burning Cliffs of Muspelheim
132.2k views
God of War: Ragnarok

EVERY WAY to Defeat The End in MGS Delta
124.2k views
Metal Gear Solid Delta: Snake Eater

Get Maelle’s Best Weapon Medalum EARLY in Clair Obscur: Expedition 33
92.6k views
Clair Obscur: Expedition 33

How to Open the Nornir Chest at The Forge in Svartalfheim
79.2k views
God of War: Ragnarok

How to Open the Nornir Chest Under the Elven Sanctum
78.3k views
God of War: Ragnarok

Mistbury Catacombs Puzzle Walkthrough - The Queen's Tomb - Enshrouded
72.5k views
Enshrouded
Silksong: How to Skip the Moorwing Boss Fight (+Flea Locations!)
69.1k views
Hollow Knight: Silksong

How to Find the Sikatag Lightroot in Zelda Tears of the Kingdom
66.6k views
The Legend of Zelda: Tears of the Kingdom
Lightning Returns - Aeronite Fight Made Easy
65.1k views
Lightning Returns: Final Fantasy XIII

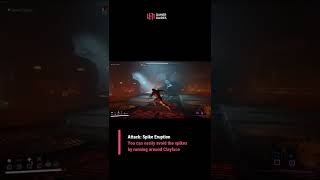
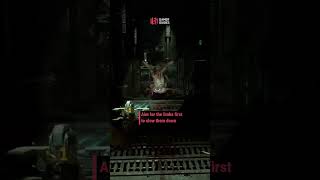
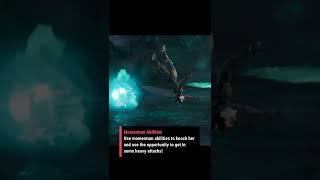
Crimson Desert – How to Defeat the Reed Devil EASILY
63.6k views
Crimson Desert

Lumos Moth Puzzle #4
62.1k views
Hogwarts Legacy

Dead Island 2 Easter Egg
59.7k views
Dead Island 2

How to Get to the Wind Temple in Tears of the Kingdom
55.8k views
The Legend of Zelda: Tears of the Kingdom
How to Open the Nornir Chest in The Oarsmen
46.1k views
God of War: Ragnarok

Forza Horizon 6 – The BEST Cars for ALL 30 Speed Zones
45.9k views
Forza Horizon 6

Why Henry's Fox is the BEST potion in Kingdom Come Deliverance 2
45.5k views
Kingdom Come: Deliverance II

Silksong: FIVE Tips to Take the Bile Out of Bilewater & Groal the Great
44.7k views
Hollow Knight: Silksong

How to Find Black Anthill Lab in Grounded 1.0
43.4k views
Grounded

How to Open the Nornir Chest at the Cliffside Ruins
42.4k views
God of War: Ragnarok

Moss Grotto Secret Area Mini Boss - Hollow Knight: Silksong
41.8k views
Hollow Knight: Silksong

How to Solve the Hive Puzzle Legendary Chest in The Barrens
40.5k views
God of War: Ragnarok
Gormander’s Imperial Gardens – Treasure Location - Enshrouded
37.4k views
Enshrouded

Lightning Returns - Simple Ereshkigal Strategy
36.7k views
Lightning Returns: Final Fantasy XIII
How to Find the Camobatures Lightroot in Zelda Tears of the Kingdom
36.6k views
The Legend of Zelda: Tears of the Kingdom

How to Find the Apapes Lightroot in Zelda Tears of the Kingdom
36.0k views
The Legend of Zelda: Tears of the Kingdom

WUCHANG: Fallen Feathers – IMMORTAL Dual Blades Build
33.4k views
WUCHANG: Fallen Feathers

Forza Horizon 6 – How to Get 3 Stars on ALL Drift Zones (Even If You Suck At It)
32.3k views
Forza Horizon 6

What to Do BEFORE the Final Boss in Clair Obscur: Expedition 33 (Spoiler-Lite)
29.8k views
Clair Obscur: Expedition 33

Fieldrunners 2: Endless Mode Strategy
27.1k views
Fieldrunners 2

Long Bomb Short for Darktide
26.3k views
Warhammer 40000: Darktide

Fell Wispwyvern Boss Guide - Enshrouded
24.6k views
Enshrouded

Don’t Miss These HIDDEN Snakes in MGS Delta
24.0k views
Metal Gear Solid Delta: Snake Eater

Get Sciel's Best Weapons CHATION and BLIZZON in Clair Obscur: Expedition 33
23.8k views
Clair Obscur: Expedition 33
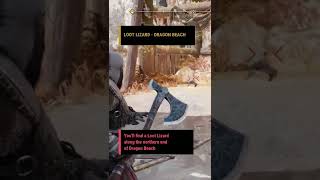
How to Kill the Loot Lizard on Dragon Beach
23.4k views
God of War: Ragnarok

Mina the Hollower – How to Win Blaise’s Races & Get the BEST Trinket
22.6k views
Mina the Hollower

Find the RARE Sandstar in Monster Hunter Wilds
21.3k views
Monster Hunter Wilds

Solving the Necrotic Laboratory Puzzle in Baldur's Gate 3 - Video Walkthrough
21.0k views
Baldur's Gate 3

Dining Room Table Puzzle Solution - Chapter 9 - Resident Evil 4 Remake
20.7k views
Resident Evil 4 Remake
Henrietta's Hideaway Gate Puzzle Solutions
20.1k views
Hogwarts Legacy

Pragmata – ALL Unlockable Outfits For Hugh & Diana
19.3k views
Pragmata

How to Kill the Loot Lizard in the Lake of Nine
18.9k views
God of War: Ragnarok

ALL Mini Cabin Figure Locations & Rewards
18.4k views
Pragmata

Diablo 4 Sorceress Lightning Build Gameplay
18.3k views
Diablo IV
Defeating the Grymforge Boss in Baldur's Gate 3
17.8k views
Baldur's Gate 3

Forza Horizon 6 – How to Smash ALL 5000 XP Bonus Boards
17.5k views
Forza Horizon 6

How to Find the Amo-ne Lightroot in Zelda Tears of the Kingdom
17.4k views
The Legend of Zelda: Tears of the Kingdom

Every Way to Find Strangelings in Fantasy Life i: The Girl Who Steals Time
17.4k views
FANTASY LIFE i: The Girl Who Steals Time

How to Open the Nornir Chest in The Veiled Passage
17.1k views
God of War: Ragnarok

The New Bannerlord Digital Companion DLC - A quick look at its features
16.9k views
Mount & Blade II: Bannerlord

How to get the Sparkthorn Flower in Nidavellir, Svartalfheim
16.8k views
God of War: Ragnarok

How to Find the Lore Scroll and Legendary Chest at Althjof's Rig
16.3k views
God of War: Ragnarok
Crimson Desert – How to Level Up FAST & the BEST Early Game Skills
16.3k views
Crimson Desert

Ratchet & Clank (2016) - Death By Disco Trophy - Dance, Baby, Dance!
15.3k views
Ratchet & Clank
How to Kill the Loot Lizard by the Raider Fort
15.2k views
God of War: Ragnarok

Fieldrunners 2 - Clonehenge (Heroic) Walkthrough
15.1k views
Fieldrunners 2

How to Kill the Bull Head Brute in RE4 Remake
14.9k views
Resident Evil 4 Remake
Forza Horizon 6 – How to Unlock ALL Barn Finds ASAP
14.8k views
Forza Horizon 6

Pragmata – The BEST Upgrades to Grab First
14.7k views
Pragmata

How to Open the Nornir Chest in Eastern Plains of The Crater
14.6k views
God of War: Ragnarok

Find Pebbles FAST in Kingdom Come Deliverance 2
14.1k views
Kingdom Come: Deliverance II
Fawnsong Frontier Building Blocks Location A Tower to the Stars - Enshrouded
13.7k views
Enshrouded

How to Kill the Loot Lizard at Modvitnir's Rig
13.4k views
God of War: Ragnarok
How to Solve the Nornir Chest in The Barrens
13.4k views
God of War: Ragnarok

Why Gore Magala Armor could be the BEST in Monster Hunter Wilds
13.3k views
Monster Hunter Wilds

How to Defeat Elias, Hatred's Remnant in Diablo 4
13.2k views
Diablo IV

How to Find the Mossy Key
13.1k views
Grounded

Silksong: How to Unlock a New Moveset for Hornet EARLY (Crest of the Wanderer)
13.0k views
Hollow Knight: Silksong

Resident Evil Requiem – ALL Collectibles in Wrenwood & Rhodes Hill (Part One)
12.6k views
Resident Evil 9: Requiem

Lightning Returns - Bhunivelze 5* Strategy
12.3k views
Lightning Returns: Final Fantasy XIII

Pragmata’s Unknown Signal Post-Game EXPLAINED (Spoiler Free!)
12.1k views
Pragmata

How to Get New Realm Seeds From Ratatoskr in God of War Ragnarok
12.1k views
God of War: Ragnarok

WUCHANG: Fallen Feathers – FIRE NINJA One-Handed Sword Build
12.0k views
WUCHANG: Fallen Feathers

Monster Hunter Wilds: How to MASTER Gold Ticket & Decoration farming
11.9k views
Monster Hunter Wilds

Dauntless Shield vs Stone Wall Shield
11.5k views
God of War: Ragnarok

Expedition 33 Expert Difficulty Guide With Dodge And Parry Tips
11.1k views
Clair Obscur: Expedition 33

Anatomical Opera Lever Puzzle
11.0k views
Warhammer 40K: Rogue Trader

New Game+ Explained
10.9k views
Metaphor: ReFantazio

Fieldrunners 2 - Carnie Guarding (Heroic) Walkthrough
10.7k views
Fieldrunners 2

Grime 2 – Best Stats, Skills, Early-Game Weapons, & More ESSENTIAL Tips
10.4k views
Grime II

Resident Evil Requiem – ALL Collectibles in Raccoon City & ARK (Part Two)
10.3k views
Resident Evil 9: Requiem

Grounded Log Moth location
10.3k views
Grounded

Dragon Age The Veilguard: Gaspin Manor Statue Puzzle Explained
10.0k views
Dragon Age: The Veilguard
How to Complete Garden for the Dead
10.0k views
God of War: Ragnarok

How to Farm Sundered Charms in Diablo 2 Resurrected
9.9k views
Diablo II: Resurrected

SNIPE Every Ga Ko and Kerotan On the Motorcycle in MGS Delta
9.8k views
Metal Gear Solid Delta: Snake Eater

Dead island 2 Curtis' Garage Keys Location
9.7k views
Dead Island 2
Equip THIS charm now in Monster Hunter Wilds: Exploiter Charm explained
9.7k views
Monster Hunter Wilds

Monster Hunter Wilds: Why you NEED the Arkculcan Armor set
9.6k views
Monster Hunter Wilds

How to Dispose of the Warhead in Dead Space Remake
9.5k views
Dead Space Remake

How to Open Nornir Chest in Goddess Falls
9.3k views
God of War: Ragnarok

How to Solve the Song of the Sands Puzzle and Free the Hafgufa
9.2k views
God of War: Ragnarok

How to Solve the Swinging Brazier Puzzle
9.2k views
God of War: Ragnarok

Defeat The Crimson Nightmare in Crimson Desert With This One Simple Trick
8.9k views
Crimson Desert

Bramblespine Boneyard Walkthrough - A Rumble in the Catacombs - Enshrouded
8.9k views
Enshrouded

How to Open the First Nornir Chest in The Sinkholes
8.7k views
God of War: Ragnarok

Find STALKER 2 BEST AR Rifle now
8.6k views
STALKER 2: Heart of Chornobyl

How to Open the Nornir Chest on Dragon Beach
8.5k views
God of War: Ragnarok

How to Kill the Loot Lizard in The Burrows
8.5k views
God of War: Ragnarok

How to Find Ni-iraram Lightroot in Zelda Tears of the Kingdom
8.4k views
The Legend of Zelda: Tears of the Kingdom

Increase Area Rank QUICKLY in Fantasy Life i: The Girl Who Steals Time
8.4k views
FANTASY LIFE i: The Girl Who Steals Time

Fieldrunners 2 - Curious Gorge (Heroic) Walkthrough
8.2k views
Fieldrunners 2

Making Early Money
8.1k views
Like a Dragon: Ishin

How to Open the Hardened War Handles Legendary Chest
7.9k views
God of War: Ragnarok

How to Kill the Loot Lizard at the Shores of Nine - South of Alfheim Tower
7.9k views
God of War: Ragnarok

Uncharted 4 - Zodiac Puzzle (Chapter 2)
7.8k views
Uncharted 4: A Thief's End

Best SP Farm in Crisis Core Reunion
7.6k views
Crisis Core Final Fantasy VII: Reunion

The Last of Us - Escape the City Walkthrough
7.5k views
The Last of Us Part I

How to Kill the Loot Lizard in the Eastern Plains of The Crater, Vanaheim
7.5k views
God of War: Ragnarok

Highest Score in 1-A Shooting Range Challenge in Resident Evil 4 Remake
7.4k views
Resident Evil 4 Remake

Silksong: Pale Oils and the Great Taste of Pharloom Food Locations
7.4k views
Hollow Knight: Silksong

Opening the Selune Gilded Chest in Baldur's Gate 3
7.2k views
Baldur's Gate 3

Fieldrunners 2 - Cardio Canyon (Heroic) Walkthrough
7.1k views
Fieldrunners 2

Mina the Hollower – How to Unlock the Map & Reveal ALL Collectibles
7.1k views
Mina the Hollower

Diablo 4: Lord of Hatred – Chained Apocalypse Warlock Build
7.0k views
Diablo IV

Farm Armor Spheres with AMAZING new Monster Hunter Wilds event
7.0k views
Monster Hunter Wilds

How to Kill the Loot Lizard in the Western Plains of The Crater, Vanaheim
6.9k views
God of War: Ragnarok

Wuchang: Fallen Feathers Preview - Pirate Souls?
6.9k views
WUCHANG: Fallen Feathers

How to Harvest Sol's Delight in Avatar
6.8k views
Avatar: Frontiers of Pandora

How to Launch the Asteroid
6.7k views
Dead Space Remake

How To Defeat The Leviathan - Dead Space Remake
6.6k views
Dead Space Remake

The Witcher 3: Gwent - Haddy - Armed Old Man Steals Child's Trading Cards
6.6k views
The Witcher 3: Wild Hunt
How to Build a Bridge in Sons of the Forest
6.6k views
Sons of the Forest

Find Mutt FAST in Kingdom Come Deliverance 2
6.6k views
Kingdom Come: Deliverance II

WUCHANG: Fallen Feathers – Where to FARM Red Mercury
6.5k views
WUCHANG: Fallen Feathers

Fieldrunners 2 - Be Mine (Heroic) Walkthrough
6.5k views
Fieldrunners 2

Watch Dogs - Fixer Contracts (Getaway)
6.4k views
Watch Dogs

Expedition 33 Gross Tete Boss Guide
6.4k views
Clair Obscur: Expedition 33

How to Open the Nornir Chest in The Southern Wilds
6.3k views
God of War: Ragnarok

How to Find EVERY Holo-Wall in Pragmata
6.2k views
Pragmata

Crimson Desert – Make INFINITE Money With This Banking Exploit
6.2k views
Crimson Desert

How to Open the Nornir Chest in the Myrkr Tunnels of Svartalfheim
6.2k views
God of War: Ragnarok

STALKER 2 Gauss location - Find the BEST rifle in the game
6.1k views
STALKER 2: Heart of Chornobyl

Dragon Age: The Veilguard - Every Lighthouse Chest
6.1k views
Dragon Age: The Veilguard

The most OBNOXIOUSLY hidden Antique Coins in Resident Evil Requiem
6.1k views
Resident Evil 9: Requiem

Lumos Moth Puzzle #3
6.0k views
Hogwarts Legacy

Location of the Clockwork Castellan in Chapter 6 of Resident Evil 4 Remake
6.0k views
Resident Evil 4 Remake

How to Kill Odin's Raven on Lyngbakr Island
5.9k views
God of War: Ragnarok
Soulblossom Flower Location - Helheim - God of War Ragnarok Nine Realms in Bloom
5.9k views
God of War: Ragnarok

How to Use Banners in M&B II: Bannerlord
5.9k views
Mount & Blade II: Bannerlord
Mina the Hollower – The BEST Trinkets Found Early
5.8k views
Mina the Hollower
Portal 2: Chapter 8 - Chamber 11
5.8k views
Portal 2

How to Catch Dandelion Seeds in Zelda: Tears of The Kingdom
5.7k views
The Legend of Zelda: Tears of the Kingdom

Witcher 3 Magic Lamp Puzzle
5.6k views
The Witcher 3: Wild Hunt

Uncharted 4 - Ringing Bells Puzzle (Ch. 11)
5.6k views
Uncharted 4: A Thief's End

What Happens if You Let Abdirak Punish You in Baldur's Gate 3?
5.5k views
Baldur's Gate 3

Location of the Clockwork Castellan in Chapter 5 - RE4 Remake
5.5k views
Resident Evil 4 Remake

Location of the Clockwork Castellan in Chapter 14 - Resident Evil 4 Remake
5.5k views
Resident Evil 4 Remake

How to Open the Nornir Chest in the Eastern Barri Woods
5.4k views
God of War: Ragnarok

Hogwarts Legacy: How to BEAT the Troll in Hogsmeade
5.4k views
Hogwarts Legacy

Location of the Clockwork Castellan in Chapter 8 - Resident Evil 4 Remake
5.4k views
Resident Evil 4 Remake

Mario Kart World: How to beat Take A Tricky Tour Through Shy Guy Bazaar
5.3k views
Mario Kart World

How to Open the Second Nornir Chest in The Applecore (Jarnsmida Pitmines)
5.3k views
God of War: Ragnarok

Fieldrunners 2 - Hokus Poke Us (Heroic) Walkthrough
5.2k views
Fieldrunners 2

Location of Blue Medallions 2 in Quarry and Fish Farm
5.2k views
Resident Evil 4 Remake

The Witcher 3: Gwent: Velen Players - Boatwright's Leaky Gwent Game
5.2k views
The Witcher 3: Wild Hunt

How to Open The Strond Brazier Nornir Chest in Alfheim
5.1k views
God of War: Ragnarok

Silksong: Best Rosary Farming Spot in ACT ONE
5.1k views
Hollow Knight: Silksong
How to Kill The Hunter in Dead Space Remake
5.1k views
Dead Space Remake

How to Fix the Comms Array in Dead Space Remake
5.1k views
Dead Space Remake
How to Awaken The Everlasting Dragon in God of War Ragnarok
5.1k views
God of War: Ragnarok

WUCHANG: Fallen Feathers – 3 EASY BUILDS to Defeat Commander Honglan With
5.1k views
WUCHANG: Fallen Feathers
Fieldrunners 2 - Dryer Straits (Heroic) Walkthrough
5.0k views
Fieldrunners 2
Sulphur Pods in Avatar: Frontiers of Pandora
5.0k views
Avatar: Frontiers of Pandora

Pokémon Pokopia – ALL Sparkling Skylands Human Records Locations
5.0k views
Pokémon Pokopia

How to Earn the "Without Protection" Achievement
5.0k views
Kingdom Come: Deliverance II

Pokemon BDSP - How to Solve the Snowpoint Gym Puzzle
4.9k views
Pokémon: Brilliant Diamond & Shining Pearl

Legend of Zelda: Breath of the Wild - Stop to Start (Rohta Chigah Shrine)
4.9k views
The Legend of Zelda: Breath of the Wild

Minecraft - Disappearing Floor Trap and Trapped Chest Help
4.8k views
Minecraft

Tomb Raider (2013) - Chamber of Judgement Solution (Optional Tomb)
4.6k views
Tomb Raider: Definitive Edition (2013)

All Three Stone Eagles From One Location
4.6k views
Sniper Elite 5

How to Find the Rikonasum Lightroot in Zelda Tears of the Kingdom
4.6k views
The Legend of Zelda: Tears of the Kingdom

How to Build Stairs in Sons of the Forest
4.6k views
Sons of the Forest

Dragon Age The Veilguard: Inquisition Choices Explained
4.6k views
Dragon Age: The Veilguard

How to Close Bug (Terminid) Holes in Helldivers 2
4.5k views
Helldivers 2

All Gob of Gobstones Locations
4.5k views
Hogwarts Legacy

Location of the Clockwork Castellan in Chapter 16 - Resident Evil 4 Remake
4.5k views
Resident Evil 4 Remake

How to Solve the Light Crystal Puzzle
4.4k views
God of War: Ragnarok

How To Use The Kinesis Module In Dead Space 2023
4.4k views
Dead Space Remake

How to QUICKLY Unlock the Farmer & Artist in Fantasy Life i: The Girl Who Steals Time
4.4k views
FANTASY LIFE i: The Girl Who Steals Time

Location of the Clockwork Castellan in Chapter 4 - Resident Evil 4 Remake
4.4k views
Resident Evil 4 Remake

Legend of Zelda: Breath of the Wild - Calamity Ganon (Master Mode)
4.4k views
The Legend of Zelda: Breath of the Wild

How to Defeat a Godmother
4.3k views
Gotham Knights
How to Open the Nornir Chest in Western Plains in Vanaheim
4.3k views
God of War: Ragnarok

Cheesing the Scavenger Gorge Matron at Glennwood's End
4.2k views
Enshrouded

How to Free the Hafgufa in Secret of the Sands
4.2k views
God of War: Ragnarok

Fieldrunners 2 - Home on Derange (Heroic) Walkthrough
4.1k views
Fieldrunners 2

Uncharted 4 - Founders Puzzle (Ch. 11)
4.1k views
Uncharted 4: A Thief's End

Borderlands 2 - Second Wind Demonstration
4.1k views
Borderlands 2

Portal 2: Chapter 8 - Chamber 15
4.0k views
Portal 2
How to Defeat the Legendary Rancor in Koboh - Jedi Survivor
4.0k views
Star Wars Jedi: Survivor

Pokémon Pokopia – ALL Rocky Ridges Human Records Locations
4.0k views
Pokémon Pokopia
Location of the Clockwork Castellan in Chapter 15 - Resident Evil 4 Remake
4.0k views
Resident Evil 4 Remake

Don't miss THESE items in the Clair Obscur Expedition 33 Prologue
3.9k views
Clair Obscur: Expedition 33

Diablo 4: Lord of Hatred – ENDGAME Shadowform Claw Warlock Build
3.9k views
Diablo IV

Where to Find the Raven in Aurvangar Wetlands
3.9k views
God of War: Ragnarok

How to Kill the Loot Lizard in The Below (Secret of the Sands favor)
3.9k views
God of War: Ragnarok

How to Open the Nornir Chest at the Well of Urd
3.8k views
God of War: Ragnarok
Location of the Clockwork Castellan in Chapter 13 - Resident Evil 4 Remake
3.8k views
Resident Evil 4 Remake
Power Node Break Room Code in Dead Space Remake
3.7k views
Dead Space Remake

Solving the Defiled Temple Puzzle
3.7k views
Baldur's Gate 3

How to Solve the Nornir Chest Puzzle in Jarnsmida Pitmines
3.7k views
God of War: Ragnarok

How to Perfect Evade and Perfect Attack in Gotham Knights
3.7k views
Gotham Knights

Gotham Knights: How to Defeat Talia al Ghul (Final Phase)
3.6k views
Gotham Knights

Pokémon Pokopia – ALL Withered Wasteland Human Records Locations
3.6k views
Pokémon Pokopia

Fieldrunners 2 - The Frying Pan (Heroic) Walkthrough
3.6k views
Fieldrunners 2

Witcher 3: Gwent - Marquise Serenity - Who Goes to a Brothel to Play Cards?
3.6k views
The Witcher 3: Wild Hunt
How to Open the Nornir Chest at Radsvinn's Rig
3.6k views
God of War: Ragnarok

Unlocking Revelations Skills
3.5k views
Like a Dragon: Ishin

How to Complete the Clickbait Side Quest in Dead Island 2
3.5k views
Dead Island 2

Watch Dogs - Fixer Contracts (Interception)
3.5k views
Watch Dogs

Kingdom Come Deliverance 2 Preview
3.5k views
Kingdom Come: Deliverance II

How to get a Magic Rod from the Hyrule South Sky Archipelago
3.5k views
The Legend of Zelda: Tears of the Kingdom
How to Solve the Viaduct Bridge Puzzle
3.5k views
Hogwarts Legacy

Fieldrunners 2 - Mean Streets (Heroic) Walkthrough
3.4k views
Fieldrunners 2

Treasure Sword and Gate Puzzle
3.4k views
Resident Evil 4 Remake
Portal 2: Co-op - Chapter 3 - Chamber 8
3.4k views
Portal 2

Dishonored: Return to the Tower - Roof Top Safe Room Infiltration (Ghost)
3.4k views
Dishonored

How to GET the MAGIC Pot Summon in Crisis Core Reunion!
3.4k views
Crisis Core Final Fantasy VII: Reunion

Lu Bu Critical Blow Tips
3.4k views
Wo Long: Fallen Dynasty
Tips for Getting Heartshots in Nightingale
3.3k views
Nightingale

Noatunn's Garden - How to Easily Beat the Golrab Trolls
3.3k views
God of War: Ragnarok
How to Turn Off the Haze Gas in Grounded 1.0 #shorts
3.3k views
Grounded

How to Align the Frequencies (Puzzle Solution)
3.3k views
Gotham Knights

MW2: All Correct Answers in El Sin Nombre
3.2k views
Call of Duty: Modern Warfare II

Broodguard Boss Tips in Diablo 4
3.2k views
Diablo IV

Hexagon Puzzle Solution
3.1k views
Resident Evil 4 Remake

High Price To Pay Secret Ending
3.1k views
Starfield

Location of the Clockwork Castellan in Chapter 7 of Resident Evil 4 Remake
3.1k views
Resident Evil 4 Remake

Fieldrunners 2 - Dry Run (Heroic) Walkthrough
3.1k views
Fieldrunners 2

How to Deliver Sara to the Mountain Base Cave Entrance
3.0k views
Dragon's Dogma 2

How to Climb the Water Ramp
3.0k views
Star Wars Jedi: Survivor

A Look at the Deluxe Edition Darkdale Armor Set
3.0k views
God of War: Ragnarok

How to Find and Unlock both Nornir Chests in Aurvangar Wetlands
3.0k views
God of War: Ragnarok

How to Get The Trick Shot Trophy in Resident Evil 4 Remake
2.9k views
Resident Evil 4 Remake

Defeating Baal at 0*
2.9k views
Disgaea 5: Alliance of Vengeance

How to Defeat a Gladiator Talon
2.9k views
Gotham Knights

Tears of the Kingdom: How to Get All Divine Beast Helms
2.9k views
The Legend of Zelda: Tears of the Kingdom

How to Open the Second Nornir Chest in The Sinkholes
2.9k views
God of War: Ragnarok

Dead Space Remake Death Animations
2.9k views
Dead Space Remake

Legend of Zelda: Breath of the Wild - Thunderblight Ganon (Master Mode)
2.8k views
The Legend of Zelda: Breath of the Wild

Grounded 1.0: How to Find the Pond Lab
2.8k views
Grounded

Master Tape Locations in Farouk's House - Resurrect the Rex - Dead Island 2
2.8k views
Dead Island 2

Location of the Clockwork Castellan in Chapter 10 - Resident Evil 4 Remake
2.8k views
Resident Evil 4 Remake

ALL Diablo 4: Lord of Hatred Progression Systems Explained (New & Returning Player's Guide)
2.7k views
Diablo IV

How to Defeat Harley Quinn
2.7k views
Gotham Knights

How to get the MW2 Daredevil Trophy Guide
2.7k views
Call of Duty: Modern Warfare II

Tomb Raider (2013) - The Flooded Vault Solution (Optional Tomb)
2.7k views
Tomb Raider: Definitive Edition (2013)
Pokémon Sword & Shield: The Crown Tundra - Ballimere Lake Footprints
2.7k views
Pokémon: Sword & Shield

WUCHANG: Fallen Feathers – Burning Barbarian AXE Build
2.7k views
WUCHANG: Fallen Feathers

How to Calibrate the ADS Cannons
2.7k views
Dead Space Remake
Portal 2: Chapter 8 - Chamber 5
2.7k views
Portal 2

How to Open the Nornir Chest in The Abandoned Village
2.7k views
God of War: Ragnarok
Fieldrunners 2 - Bizaarre Bazaar (Heroic) Walkthrough
2.7k views
Fieldrunners 2
Portal 2: Chapter 7 - Chamber 7
2.6k views
Portal 2

Animal Crossing: New Leaf - Gulliver
2.6k views
Animal Crossing: New Leaf
Fieldrunners 2 - End of Doom (Heroic) Walkthrough
2.6k views
Fieldrunners 2

Fieldrunners 2 - Speedhenge (Heroic) Walkthrough
2.5k views
Fieldrunners 2

Deus Ex: Human Revolution - Sewer Route Into Police Station
2.5k views
Deus Ex: Human Revolution

Dishonored: The Flooded District - Daud Pickpocket (Ghost)
2.5k views
Dishonored

How to Open the Nornir Chest in The Broken Prison
2.5k views
God of War: Ragnarok

How to Defeat Bitores Méndez in Chapter 6 - Resident Evil 4 Remake
2.5k views
Resident Evil 4 Remake

Location of the Clockwork Castellan in Chapter 9 - Resident Evil 4 Remake
2.5k views
Resident Evil 4 Remake

How to Get the Genji Shield in Crisis Core Reunion
2.5k views
Crisis Core Final Fantasy VII: Reunion

How to Open the Nornir Chest in The Applecore (Jarnsmida Pitmines)
2.4k views
God of War: Ragnarok

Pokemon Legends Arceus [Daybreak] - The Ultimate Balloon Race
2.4k views
Pokémon Legends: Arceus

ALL East and West Dryridge Desert Leafe Locations in Fantasy Life i: The Girl Who Steals Time
2.4k views
FANTASY LIFE i: The Girl Who Steals Time
Portal 2: Chapter 8 - Chamber 16
2.4k views
Portal 2

How to Open the Southwestern Nornir Chest in The Forbidden Sands
2.4k views
God of War: Ragnarok

Gortash has had Enough!
2.4k views
Baldur's Gate 3

Star Ocean: Integrity and Faithlessness - Der Suul Boss Fight - Death Spam, The Boss
2.4k views
Star Ocean: Integrity and Faithlessness

How to Feed Shitieshou Demons in Wo Long: Fallen Dynasty
2.4k views
Wo Long: Fallen Dynasty

Darak Boss Fight Tips - No Rest for the Wicked
2.3k views
No Rest for the Wicked

Pokémon Sword & Shield: The Crown Tundra - Giant's Bed Footprints
2.3k views
Pokémon: Sword & Shield

Location of the Clockwork Castellan in Chapter 11 - Resident Evil 4 Remake
2.3k views
Resident Evil 4 Remake
Fieldrunners 2 - Ring of Fire (Heroic) Walkthrough
2.3k views
Fieldrunners 2

Pokemon Omega Ruby & Alpha Sapphire: Breeding Guide
2.3k views
Pokémon: Omega Ruby & Alpha Sapphire

Minecraft - Redstone Circuit Basics and Trap Doors
2.3k views
Minecraft

Atomfall - Vehicle Bunker Storeroom Key Walkthrough
2.3k views
Atomfall

How to Open the Nornir Chest in The Below
2.3k views
God of War: Ragnarok

Pokémon Sword & Shield: The Crown Tundra - Frigid Sea Footprints
2.2k views
Pokémon: Sword & Shield

How to Open the Nornir Chest on Alberich Island
2.2k views
God of War: Ragnarok

Mimiphyta Helmet
2.2k views
Monster Hunter Wilds

Witcher 3: Ifrit (Death March) - Basically a Lazy Golem Palette-Swap + Fire
2.2k views
The Witcher 3: Wild Hunt

Portal 2: Co-op - Chapter 4 - Chamber 9
2.2k views
Portal 2

Bravely Second - The Revenant (Guardian Asterisk) One-Shot Boss Strategy
2.2k views
Bravely Second: End Layer

How to Defeat the Gradungr Without Being Hit
2.1k views
God of War: Ragnarok

How to find the LEGENDARY Texan Shotgun in STALKER 2
2.1k views
STALKER 2: Heart of Chornobyl

Lightning Returns - Caius Ballad 5* Strategy
2.1k views
Lightning Returns: Final Fantasy XIII

Resident Evil 6 - Chris Campaign: Helicopter Battle
2.1k views
Resident Evil 6

Bravely Second - Ba'al Diamante Boss Strategy
2.1k views
Bravely Second: End Layer

Ratchet & Clank (2016) - Dr. Nefarious Boss Fight - Lawrence!
2.1k views
Ratchet & Clank

How To Kill the Nazi Spy
2.1k views
Sniper Elite 5

Fieldrunners 2 - Twist of Fate (Heroic) Walkthrough
2.1k views
Fieldrunners 2

How to Complete the Centrifuge Puzzle
2.0k views
Dead Space Remake

Hogwarts Legacy - Ghosts of Our Love
2.0k views
Hogwarts Legacy

Location of the Clockwork Castellan in Chapter 12 - Resident Evil 4 Remake
2.0k views
Resident Evil 4 Remake

Merlin Trials? EVERY LOCATION FOUND!
2.0k views
Hogwarts Legacy

Dead Space Remake Break Room Codes - Audio Log
2.0k views
Dead Space Remake

How to Open the Nornir Chest Draupnir Spear Puzzle in The Strond
2.0k views
God of War: Ragnarok

Legend of Zelda: Breath of the Wild - Trial of the Sword - Floor 10 (Beginning Trials)
2.0k views
The Legend of Zelda: Breath of the Wild

Pokémon Pokopia – ALL Bleak Beach Human Records Locations
1.9k views
Pokémon Pokopia

How to Defeat Jack Krauser in Chapter 11 - Resident Evil 4 Remake
1.9k views
Resident Evil 4 Remake
Clayface Boss Fight: Phase 2
1.9k views
Gotham Knights

How to Deflect Aoye in Wo Long
1.9k views
Wo Long: Fallen Dynasty

Grab Monster Hunter Wilds EXCLUSIVE new gear before it's gone forever
1.9k views
Monster Hunter Wilds

STALKER 2 Weight limit problems SOLVED
1.9k views
STALKER 2: Heart of Chornobyl

Professor Hojo Deep-Dive
1.9k views
Final Fantasy VII Remake Intergrade

Bile Spewer Locations - Helldivers 2
1.9k views
Helldivers 2

Use THESE Collection Chest Hogwarts Legacy TIPS
1.9k views
Hogwarts Legacy

How to Defeat Brutes in Dead Space Remake
1.9k views
Dead Space Remake

How to Setup The Acid Lab
1.9k views
Grand Theft Auto V

Portal 2: Co-op - Chapter 4 - Chamber 7
1.8k views
Portal 2

Deus Ex: Human Revolution - Secret Praxis Pack Tai Yong Medical Centre
1.8k views
Deus Ex: Human Revolution

Genshin Impact: Varuna Gatha Leaf Puzzle
1.8k views
Genshin Impact
How to Replace the Damaged Tram
1.8k views
Dead Space Remake

How to Reach the Fire Temple - Tears of the Kingdom
1.8k views
The Legend of Zelda: Tears of the Kingdom

How to Fatal Strike in Wo Long: Fallen Dynasty
1.8k views
Wo Long: Fallen Dynasty

Legend of Zelda: Breath of the Wild - Mirro Shaz Shrine
1.8k views
The Legend of Zelda: Breath of the Wild
Gotham Knights: How to Beat Talia al Ghul
1.8k views
Gotham Knights

TAQ-56 Loadout gameplay in MW2
1.8k views
Call of Duty: Modern Warfare II

FF16 - Carved in Stone Side Quest - Correct Answers
1.8k views
Final Fantasy XVI

Location of the Clockwork Castellan in Chapter 3 of Resident Evil 4 Remake
1.8k views
Resident Evil 4 Remake

Portal 2: Chapter 6 - Chamber 3
1.7k views
Portal 2

Witcher 3: Gwent - Old Sage of Benek - Sage Predicts Future, Still Sucks at Gwent
1.7k views
The Witcher 3: Wild Hunt

Bravely Second - Final Boss: False God Providence Simple Strategy
1.7k views
Bravely Second: End Layer

How to Clear the Hive Puzzle in Secret of the Sands
1.7k views
God of War: Ragnarok

Fast travel explained in STALKER 2
1.7k views
STALKER 2: Heart of Chornobyl

Ratchet & Clank (2016) - Captain Qwark Boss Fight - I'm Useless!
1.7k views
Ratchet & Clank

Dishonored: Lady Boyle's Last Party - Upstairs Infiltration (Ghost)
1.7k views
Dishonored

Portal 2: Chapter 8 - Chamber 12
1.7k views
Portal 2

Fieldrunners 2 - Broken Branch (Heroic) Walkthrough
1.7k views
Fieldrunners 2

Grand Theft Auto V - The Bureau Raid Heist: Fire Crew Approach (Gold Medal)
1.7k views
Grand Theft Auto V

Fieldrunners 2 - Turbo Dryer (Heroic, No Items) Walkthrough Version 3
1.7k views
Fieldrunners 2
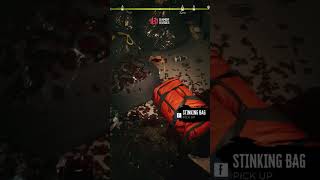
Where to Find Luther's Reeking Bag - Lending a Hand Quest - Dead Island 2
1.7k views
Dead Island 2

How Not to Fight a Flamethrower Hulk in Helldivers 2
1.7k views
Helldivers 2

Clayface Boss Fight: Phase 1
1.7k views
Gotham Knights

Fieldrunners 2 - Tangled Turnpike (Heroic) Walkthrough
1.7k views
Fieldrunners 2

Gorge Crash Site Treasure Locations
1.7k views
Star Wars Jedi: Survivor

Fieldrunners 2 - Last Limbo (Heroic) Walkthrough
1.6k views
Fieldrunners 2

Is this one of the best mounted challenge spots in MW2?
1.6k views
Call of Duty: Modern Warfare II

How to Solve the Rutafu-um Shrine Puzzle in Hebra Mountains Cave
1.6k views
The Legend of Zelda: Tears of the Kingdom

MW2 Crocodile Trophy Guide
1.6k views
Call of Duty: Modern Warfare II
Uncharted 4 - Floor of Death Puzzle (Ch. 19)
1.6k views
Uncharted 4: A Thief's End

Log Dupe Glitch
1.6k views
Sons of the Forest

Bravely Second - Geist Grace (Exorcist Asterisk) Boss Strategy
1.6k views
Bravely Second: End Layer
Location of the Clockwork Castellan in Chapter 2 - Resident Evil 4 Remake
1.6k views
Resident Evil 4 Remake
Vukah Brawler Boss Guide - Enshrouded
1.6k views
Enshrouded

Pokémon Violet - How to Find the RARE Paradox Pokémon Iron Valiant
1.6k views
Pokémon Scarlet & Violet

Grime 2 – Tankard Warden Boss Guide | EASY Bladeroot Sword Strategy
1.6k views
Grime II

Diablo 4 Beta Sorceress Build - Fiery Frozen Orb #shorts #diablo4
1.6k views
Diablo IV
Location of the Clockwork Castellan in Chapter 1 of RE4 Remake
1.6k views
Resident Evil 4 Remake
Pokemon Legends Arceus: Origin Palkia Fight (No Damage)
1.5k views
Pokémon Legends: Arceus

How to Defeat Khazra the Abomination Solo in Diablo 4 #shorts #diablo4 #bossfight
1.5k views
Diablo IV

Portal 2: Chapter 7 - Chamber 6
1.5k views
Portal 2
Lightning Returns - Noel Kreiss Easy 5* Strategy
1.5k views
Lightning Returns: Final Fantasy XIII

Grounded 1.0: How to Find the Haze Lab
1.5k views
Grounded

Pokemon TCG Pocket: The BEST tips for beginners
1.5k views
Pokémon Trading Card Game Pocket

How to Kill the Giant Troll (El Gigante) in Chapter 4 of RE4 Remake
1.5k views
Resident Evil 4 Remake

Uncharted 4 - Wingman Trophy (Chapter 2)
1.5k views
Uncharted 4: A Thief's End

Mass Effect 3 - Tuchanka: Activating the Two Hammers
1.5k views
Mass Effect 3 Legendary Edition

Lumos Moth Puzzle #2
1.5k views
Hogwarts Legacy

Dishonored: High Overseer Campbell - Gentleman Callers (Ghost)
1.5k views
Dishonored

Portal 2: Co-op - Chapter 5 - Chamber 6
1.5k views
Portal 2

Portal 2: Chapter 6 - Chamber 5
1.4k views
Portal 2

Diablo 4 Necromancer Build Corpse Explosion + Bone Spear #shorts #diablo4
1.4k views
Diablo IV

Portal 2: Chapter 6 - Chamber 7
1.4k views
Portal 2

Leon Protects Ashley from the Castle Zealots in Resident Evil 4 Remake
1.4k views
Resident Evil 4 Remake

Fieldrunners 2 - High Steaks (Heroic) Walkthrough
1.4k views
Fieldrunners 2

Bravely Second - Lord Providence (Final Boss Form 1) Boss Strategy
1.4k views
Bravely Second: End Layer
Portal 2 : Chapter 4 - Chamber 2
1.4k views
Portal 2

Watch Dogs - Fixer Contracts (Decoy)
1.4k views
Watch Dogs

How to Get a Golem in Diablo 4 #shorts #diablo4
1.4k views
Diablo IV

How To Get The Keeping This One Trophy in CoD MW2
1.4k views
Call of Duty: Modern Warfare II

Fire Emblem: Awakening - Dancer Class
1.4k views
Fire Emblem: Awakening

Legend of Zelda: Breath of the Wild - Trial of the Sword - Floor 23 (Final Trials)
1.4k views
The Legend of Zelda: Breath of the Wild

Fieldrunners 2 - Tangled Express (Heroic) Walkthrough
1.4k views
Fieldrunners 2

Clayface Boss Fight: Phase 3
1.4k views
Gotham Knights

All Schematics in Chapter 2 in Dead Space Remake
1.4k views
Dead Space Remake

Portal 2: Co-op - Chapter 3 - Chamber 7
1.3k views
Portal 2

You MUST find this Elden Ring Easter Egg in Kingdom Come Deliverance 2
1.3k views
Kingdom Come: Deliverance II
Best Nightwing Combos
1.3k views
Gotham Knights

How to Get Godlike Trophy
1.3k views
Crisis Core Final Fantasy VII: Reunion

Portal 2: Co-op - Chapter 1 - Chamber 6
1.3k views
Portal 2

Portal 2: Co-op - Chapter 5 - Chamber 2
1.3k views
Portal 2

Portal 2: Co-op - Chapter 4 - Chamber 8
1.3k views
Portal 2

Mario Kart World: How to ACTUALLY unlock Mirror Mode
1.3k views
Mario Kart World

Uncover the Secret The Way of the Three Quest in Diablo 4! #shorts #diablo4
1.3k views
Diablo IV
Legend of Zelda: Breath of the Wild - Fireblight Ganon (Master Mode)
1.3k views
The Legend of Zelda: Breath of the Wild

How to Catch the Serpenthead
1.3k views
The Legend of Heroes: Trails from Zero

Star Ocean: Integrity and Faithlessness - Protecting Anne - Like Moths to a Flame
1.2k views
Star Ocean: Integrity and Faithlessness

Where to Find the Wrench in RE4 Remake
1.2k views
Resident Evil 4 Remake

Ratchet & Clank (2016) - Mrs. Zurkon Boss Fight - Mama Zurkon
1.2k views
Ratchet & Clank

Fieldrunners 2 - Turbo Dryer (Heroic) Walkthrough
1.2k views
Fieldrunners 2

How to Kill the Chainsaw Sisters in Resident Evil 4 Remake
1.2k views
Resident Evil 4 Remake

Vanadis Boss Fight
1.2k views
God of War: Ragnarok

Absconder Encounter
1.2k views
Hogwarts Legacy

Forza Horizon 6 – ALL Treasure Car Locations & Clues
1.2k views
Forza Horizon 6

Animal Crossing: New Leaf - Earning Early Money
1.2k views
Animal Crossing: New Leaf

How to Earn Mira by Fishing for Rainbow Trout
1.2k views
The Legend of Heroes: Trails from Zero

How to Find All Collectibles in The Canyons
1.2k views
God of War: Ragnarok

Fieldrunners 2 - Scrambled Eggs (Heroic) Walkthrough
1.1k views
Fieldrunners 2

Every Summon in Final Fantasy VII Remake
1.1k views
Final Fantasy VII Remake Intergrade

How to Find and Defeat Treasure Goblins in Diablo 4
1.1k views
Diablo IV

Portal 2: Chapter 7 - Chamber 4
1.1k views
Portal 2

Portal 2 - Professor Portal/Friends With Benefits Co-op Achievement
1.1k views
Portal 2

How to Get the Fierce Deity Set (Misko's Treasure)
1.1k views
The Legend of Zelda: Tears of the Kingdom

The Legend of Zelda: A Link Between Worlds - Yuga Final Battle
1.1k views
The Legend of Zelda: A Link Between Worlds

Gotham Knights: How to Defeat Man-Bat
1.1k views
Gotham Knights
Portal 2: Chapter 4 - Chamber 1
1.1k views
Portal 2

Uncharted 4 - Crosses & Wheels Puzzle (Ch. 9)
1.1k views
Uncharted 4: A Thief's End

Uncharted 4 - Rotating Lights Puzzle (Ch. 12)
1.1k views
Uncharted 4: A Thief's End

Portal 2: Chapter 7 - Chamber 1
1.1k views
Portal 2

Finding the Bugs in The Penguin's Office
1.1k views
Gotham Knights

Lachmann-762: The Loadout You SHOULD be Using in MW2
1.1k views
Call of Duty: Modern Warfare II

All New (and existing) Hairstyles in Elden Ring
1.1k views
Elden Ring

Tears of the Kingdom: How to Complete the Wind Temple
1.1k views
The Legend of Zelda: Tears of the Kingdom

Bravely Second - Denys Geneologia (Kaiser Asterisk) Boss Strategy
1.1k views
Bravely Second: End Layer

Zakru's Promise Bladewing Moth Trail - Avatar: Frontiers of Pandora
1.1k views
Avatar: Frontiers of Pandora

Gossamer Lakes - Bladewing Moth Trail - Avatar
1.1k views
Avatar: Frontiers of Pandora

Star Ocean: Integrity and Faithlessness - Protecting Anne (Second Time) - Fragile Handle With Care
1.0k views
Star Ocean: Integrity and Faithlessness
How to Parry With the Combat Knife in RE4 Remake
1.0k views
Resident Evil 4 Remake

How to Get the Shinra's Squats Champion Trophy
1.0k views
Crisis Core Final Fantasy VII: Reunion

Portal 2: Chapter 6 - Chamber 4
1.0k views
Portal 2

Portal 2: Chapter 7 - Chamber 5
1.0k views
Portal 2

Portal 2: Chapter 7 - Chamber 3
995 views
Portal 2

Bravely Default - Behemoth Fight
985 views
Bravely Default

Find the LEGENDARY Cavalier Rifle in Stalker 2 now
975 views
STALKER 2: Heart of Chornobyl
Metal Gear Solid V: Ground Zeroes - (Main Mission) Ground Zeroes Mission S-Rank Walkthrough
971 views
Metal Gear Solid V: Ground Zeroes

Tomb Raider (2013) - Tomb of the Unworthy Solution (Optional Tomb)
965 views
Tomb Raider: Definitive Edition (2013)

Mass Effect 3: Omega DLC - Final Battle
960 views
Mass Effect 3 Legendary Edition

Watch Dogs - Fixer Contracts (Transporter)
958 views
Watch Dogs

Bravely Second - Anne Ultimate Boss Strategy
950 views
Bravely Second: End Layer

Bellibolt Will DESTROY Decidueye With This Build
943 views
Pokémon Scarlet & Violet

Tomb Raider (2013) - Stormguard Sanctum Solution (Optional Tomb)
941 views
Tomb Raider: Definitive Edition (2013)
Pikmin 3 - Shaggy Long Legs Mini Boss
937 views
Pikmin 3

Heroes Will Rise Trophy: How to Repel The Dragon in Wo Long
932 views
Wo Long: Fallen Dynasty
How to Defeat Freaks
925 views
Gotham Knights
Assassin's Creed III: Sequence 7 Boat Stealth Objectives
917 views
Assassin's Creed III

All Garuda Eikon Abilities in Final Fantasy XVI
911 views
Final Fantasy XVI

Pokemon Omega Ruby & Alpha Sapphire: Legendary Guide
910 views
Pokémon: Omega Ruby & Alpha Sapphire

AC4: Legendary Ships - HMS Fearless & Royal Sovereign
907 views
Assassin's Creed IV: Black Flag

Portal 2: Chapter 4 - Chamber 3
900 views
Portal 2

Deus Ex: Human Revolution - Hyron Project Boss Strategy
899 views
Deus Ex: Human Revolution

AC4: Legendary Ships - HMS Prince
899 views
Assassin's Creed IV: Black Flag

Borderlands 2 - Assault on Dragon Keep: Jumping Puzzle
886 views
Borderlands 2

How to Defeat Clayface - Special Attacks
886 views
Gotham Knights
Portal 2: Co-op - Chapter 4 - Chamber 2
882 views
Portal 2

Portal 2: Co-op - Chapter 5 - Chamber - 8 (Part 1)
879 views
Portal 2

Watch Dogs - Criminal Convoys
879 views
Watch Dogs
Assassin's Creed III: Underground Feather
875 views
Assassin's Creed III

Don't Miss the W-870 Shotgun in RE4 Remake
873 views
Resident Evil 4 Remake

Portal 2: Co-Op - Chapter 2 - Chamber 7
869 views
Portal 2
Fieldrunners 2 - Meanwhile (Heroic) Walkthrough
863 views
Fieldrunners 2

Legend of Zelda: Breath of the Wild - Waterblight Ganon (Master Mode)
860 views
The Legend of Zelda: Breath of the Wild
All Blue Medallions in the Farm
856 views
Resident Evil 4 Remake
Where to find the Machete in Sons of the Forest
853 views
Sons of the Forest

Final Fantasy XIII-2 - Caius in Void Beyond (Paradox Ending) Fight
835 views
Final Fantasy XIII-2

Pokémon Scarlet and Violet: How to Evolve Pawmo into Pawmot.
833 views
Pokémon Scarlet & Violet

Portal 2: Chapter 8 - Chamber 3
830 views
Portal 2

Portal 2: Co-op - Chapter 5 - Chamber - 8 (Part 2)
828 views
Portal 2

Portal 2: Co-op - Chapter 2 - Chamber 8
826 views
Portal 2
Castlevania: Lords of Shadow - Satan Fight
826 views
Castlevania: Lords of Shadows

Grand Theft Auto V - The Jewelry Heist: Smart Approach (Gold Medal)
825 views
Grand Theft Auto V

Stomping in Bathrooms
823 views
Dead Space Remake

How To Evolve Charcadet into Armarouge in Pokémon Scarlet & Violet
821 views
Pokémon Scarlet & Violet

How to Survive the Chainsaw Man in RE4 Remake
821 views
Resident Evil 4 Remake

Portal 2: Chapter 7 - Chamber 2
808 views
Portal 2

Grand Theft Auto V - All 50 Stunt Jumps Guide
806 views
Grand Theft Auto V

How to Complete the Owl Sphere Puzzle
791 views
Gotham Knights

Portal 2: Chapter 6 - Chamber 8
788 views
Portal 2

Muddy Murder, Flan Prince Video Guide
767 views
Final Fantasy XVI

Dark Souls II: Mirror Knight Fight
763 views
Dark Souls II

Fen Vigor Farm
759 views
Lords of the Fallen (2023)
Where to Find All Batarangs in Gotham Heights
757 views
Gotham Knights
Pokémon SV: All Violet Paradox Pokémon
753 views
Pokémon Scarlet & Violet

How to change a Pokémon's Tera Type in Pokémon Scarlet and Viole
749 views
Pokémon Scarlet & Violet

How to Defeat The First Boss Zhang Liang
735 views
Wo Long: Fallen Dynasty
Watch Dogs - Gang Hideouts
732 views
Watch Dogs

Assassin's Creed III: Hidden Underground Peg Leg Trinket 1
730 views
Assassin's Creed III

Portal 2: Chapter 8 - Chamber 6
728 views
Portal 2

Watch Dogs - Weapons Trade: We Hit the Motherlode
717 views
Watch Dogs

The Last of Us - Fighting Humans Tips
714 views
The Last of Us Part I

The best skills to inherit early in Metaphor ReFantazio
712 views
Metaphor: ReFantazio
Uncharted 4 - On Porpoise Trophy (Chapter 12)
706 views
Uncharted 4: A Thief's End

Ratchet & Clank (2016) - Blargian Snagglebeast Boss Fight - You did what?!
703 views
Ratchet & Clank

How to Unlock The It's Over 50,000 Trophy in Final Fantasy 16
703 views
Final Fantasy XVI

How to Beat Gryla Boss Fight
697 views
God of War: Ragnarok

How To Solve Hogwarts Legacy Animal Door Puzzles
696 views
Hogwarts Legacy

Pokémon TCG Pocket's BIGGEST Event Yet Is Here!
694 views
Pokémon Trading Card Game Pocket

Bravely Default - Salve-Maker Qada Fight
693 views
Bravely Default
How To Beat Zhang Rang: Wo Long: Fallen Dynasty
693 views
Wo Long: Fallen Dynasty
Resident Evil 6 - Chris Campaign: Snake Battle
685 views
Resident Evil 6

Gentleman Thief Trophy: MW2 Safe Codes Guide
678 views
Call of Duty: Modern Warfare II
Mass Effect 3 - Citadel: First Phantom Battle
669 views
Mass Effect 3 Legendary Edition

Uncharted 4 - Stage Fright Trophy (Chapter 11)
669 views
Uncharted 4: A Thief's End

How to Get The Backpack Guy Trophy in MW2
667 views
Call of Duty: Modern Warfare II

Assassin's Creed 4: Legendary Ships - La Dama Negra
666 views
Assassin's Creed IV: Black Flag

Tchia: Top 5 Animals to Soul-Jump into
661 views
Tchia

Fieldrunners 2 - Flash Fire (Heroic) Walkthrough
660 views
Fieldrunners 2

Enshrouded Sulfur Farming Route
660 views
Enshrouded

Deus Ex: Human Revolution - Secret Praxis Pack Picus
659 views
Deus Ex: Human Revolution

This Is What Intensive Care Looks Like in the Dead Space Remake
658 views
Dead Space Remake

Easy Gold Trophies for Diving Challenges
658 views
Tchia
Darksiders II - Bheithir Boss Fight
655 views
Darksiders II

How To Beat The Demonized Officer In Wo Long
649 views
Wo Long: Fallen Dynasty
Diablo 4 - Rogue Beta Build - Shadow Flurry
647 views
Diablo IV

Portal 2: Chapter 8 - Chamber 4
640 views
Portal 2

Deus Ex: Human Revolution - Yelena Boss Strategy
631 views
Deus Ex: Human Revolution

AC4: Legendary Ships - El Impoluto
620 views
Assassin's Creed IV: Black Flag
Portal 2: Co-op - Chapter 5 - Chamber 4
619 views
Portal 2

Portal 2: Chapter 3 - Chamber 1
609 views
Portal 2

How to Shield Surf in The Legend of Zelda: Tears of the Kingdom
609 views
The Legend of Zelda: Tears of the Kingdom

Unknown Text Break Room Code
608 views
Dead Space Remake

Star Ocean: Integrity and Faithlessness - Pavine Boss Fight - Pew Pew Pew!
607 views
Star Ocean: Integrity and Faithlessness

Grounded 1.0: How to Find Hedge Lab
602 views
Grounded

Portal 2: Chapter 5 (Escape part 1)
583 views
Portal 2

The Last of Us - Fighting Infected Tips
583 views
The Last of Us Part I

Lightning Returns - Parandus 5* Strategy
583 views
Lightning Returns: Final Fantasy XIII

M4: The Loadout You SHOULD be Using in MW2
583 views
Call of Duty: Modern Warfare II

Svarog Location and Attacks Video
583 views
Final Fantasy XVI

Unlocking the Never Coming Down Trophy in FF16
578 views
Final Fantasy XVI
Bravely Default - Gigas Lich Fight
576 views
Bravely Default

ALL Viridia Plateau, Pettlewing Woods, and Shroomhaven LEAFES in Fantasy Life i
575 views
FANTASY LIFE i: The Girl Who Steals Time

Castlevania: Lords of Shadow - The Dracolich Fight
564 views
Castlevania: Lords of Shadows

Grand Theft Auto V - The Merryweather Heist: Freighter Approach (Gold Medal)
564 views
Grand Theft Auto V

Resident Evil 6 - Chris Campaign: Bee Swarm
563 views
Resident Evil 6

Portal 2 - Chapter 9 (Part 4)
559 views
Portal 2

Mass Effect 3: Omega DLC - Bomb Disposal
554 views
Mass Effect 3 Legendary Edition

Portal 2 - Chapter 9 (Part 2)
552 views
Portal 2
Portal 2: Chapter 5 (Escape part 4)
546 views
Portal 2

Legend of Zelda: Breath of the Wild - Windblight Ganon (Master Mode)
544 views
The Legend of Zelda: Breath of the Wild

Gholdengo smashes Psychic Tera Raids
544 views
Pokémon Scarlet & Violet

Legend of Zelda: Breath of the Wild - Yiga Clan Hideout & Master Kohga
542 views
The Legend of Zelda: Breath of the Wild
Portal 2 - Chapter 9 (Part 3)
541 views
Portal 2

Transformers: Fall of Cybertron - Chapter IV: Bomb Escort
540 views
Transformers: Fall of Cybertron
Transformers: Fall of Cybertron - Chapter II: Neutron Gun Protection
535 views
Transformers: Fall of Cybertron

Mass Effect 3: Citadel DLC - Armax Arena Mirror Match
526 views
Mass Effect 3 Legendary Edition

How to Unlock the Beat Rocking Trophy in Final Fantasy 16
525 views
Final Fantasy XVI

STB 556: The Loadout You SHOULD be Using in MW2
518 views
Call of Duty: Modern Warfare II

Bravely Default - Vampire DeRosso Fight
516 views
Bravely Default
Theophilus Harlow Boss Battle
513 views
Hogwarts Legacy

Uncharted 4 - Avery's Grave Puzzle (Ch. 8)
511 views
Uncharted 4: A Thief's End

Atomfall - How to Find the Metal Detector FAST
509 views
Atomfall

Portal 2: Four Ring Circus Achievement
504 views
Portal 2

Resident Evil 6 - Leon Campaign: Shark Boss
504 views
Resident Evil 6

Bravely Default - Chaugmar Fight
504 views
Bravely Default

The Witcher 3: - Botchling (Death March!) - Because "Abortionling" Was Too Triggering
502 views
The Witcher 3: Wild Hunt
Portal 2: Chapter 5 (Escape part 3)
501 views
Portal 2

Mass Effect 3: Citadel DLC - Armax Arena Reaper Solo Challenge
499 views
Mass Effect 3 Legendary Edition

The Last of us Theme Song in Tchia
498 views
Tchia
The Last of Us - Bill's Town: High School Escape - Ambush
497 views
The Last of Us Part I

Bravely Default - Red Mage DeRosa Fight
495 views
Bravely Default

Portal 2: You Monster Achievement
487 views
Portal 2

Pokemon X and Y: Gym Leader Valerie Battle
480 views
Pokémon: X & Y

Mass Effect 3: Citadel DLC - Armax Arena Fatal Error Battle
479 views
Mass Effect 3 Legendary Edition
Bjorn Boss Fight
476 views
God of War: Ragnarok
Portal 2: Iron Grip Achievement
475 views
Portal 2

Animal Crossing: New Leaf - Turnips
473 views
Animal Crossing: New Leaf

Bravely Default - Ouroboros (Bringer of Ruin Form) Fight
473 views
Bravely Default

Portal 2: Co-op - Chapter 4 - Chamber 6
472 views
Portal 2

Deus Ex: Human Revolution - Hugh Darrow eBook 20 - Better Than Nature
468 views
Deus Ex: Human Revolution

Best Armarouge / Ceruledge Raid Builds
467 views
Pokémon Scarlet & Violet

Hive Mind Boss Fight Guide
456 views
Dead Space Remake

Portal 2: Chapter 6 - Chamber 1
454 views
Portal 2

How To Complete First Dose Welcome To The Troupe
454 views
Grand Theft Auto V
Portal 2: Co-op - Chapter 2 - Chamber 5
452 views
Portal 2
Final Fantasy XIII-2 - Caius in Dying World (Paradox Ending)
451 views
Final Fantasy XIII-2

Portal 2 - Chapter 9 (Part1)
449 views
Portal 2

Uncharted 4 - Swordmaster Trophy (Ch. 22)
449 views
Uncharted 4: A Thief's End

Portal 2: Chapter 6 - Chamber 6
448 views
Portal 2

Nidhogg Boss Fight
438 views
God of War: Ragnarok

ALL East, West, and South GREATGUT PLAINS Leafes in Fantasy Life i: The Girl Who Steals Time
435 views
FANTASY LIFE i: The Girl Who Steals Time

Deus Ex: Human Revolution - Tai Yong Medical Helipad Boxguard Strategy
432 views
Deus Ex: Human Revolution

The Legend of Zelda Skyward Sword - Levias and Bilocyte Fight
432 views
The Legend of Zelda: Skyward Sword HD

The average first time Diablo 4 world boss gameplay experience #shortsfeed #shorts
430 views
Diablo IV

Portal 2: Co-Op - Chapter 4 - Chamber 4
429 views
Portal 2

Bravely Default - The Evil One (Final Form) Fight
426 views
Bravely Default

Portal 2: Co-op - Chapter 3 - Chamber 5
424 views
Portal 2

Lightning Returns - Snow Villiers 5* Strategy
423 views
Lightning Returns: Final Fantasy XIII

Deus Ex: Human Revolution - Hugh Darrow eBook 24 - Healing Thyself Health Preservation Implants
422 views
Deus Ex: Human Revolution

How to Defeat Court of Owls Enemies
422 views
Gotham Knights

Metal Gear Solid V: Ground Zeroes - Eliminate the Renegade Threat S-Rank Walkthrough
421 views
Metal Gear Solid V: Ground Zeroes

Portal 2: Chapter 5 (Escape Part 2)
420 views
Portal 2

Ahriman Attack Tips
416 views
Final Fantasy XVI

Fire Emblem: Awakening - Moving Units
415 views
Fire Emblem: Awakening

Darksiders II - The Guardian Boss Fight
414 views
Darksiders II

Bloodborne - Honoring Wishes Ending
412 views
Bloodborne

Borderlands 2 - Handsome Jack Boss Fight
403 views
Borderlands 2

Portal 2: Chapter 3 - Chamber 2
402 views
Portal 2

Final Fantasy XIII-2 - Final Battle: Jet Bahamut
399 views
Final Fantasy XIII-2

Portal 2: Co-op - Chapter 2 - Chamber 4
398 views
Portal 2

Final Fantasy XIII-2 - Caius in Oerba (Paradox Ending) Fight
397 views
Final Fantasy XIII-2

Mass Effect 3 - Eden Prime: Enroute to Second Data Feed
396 views
Mass Effect 3 Legendary Edition

Den Mother Returns For Diablo 4 #shorts #diablo4
396 views
Diablo IV

Grand Theft Auto V - The Paleto Score Heist (Gold Medal)
393 views
Grand Theft Auto V

Mass Effect 3: Leviathan DLC - Mahavid Drone Battle
388 views
Mass Effect 3 Legendary Edition

Final Fantasy XIII-2 - Gorgyra Fight
386 views
Final Fantasy XIII-2

Final Fantasy XIII-2 - Atlas (Full Power)
385 views
Final Fantasy XIII-2
Bravely Default - Ouroboros (First and Second God Forms) Fight
384 views
Bravely Default

Final Fantasy XIII-2 - Jihl Nabaat Coliseum Fight
384 views
Final Fantasy XIII-2

Lachmann-556: The Loadout You SHOULD be Using in MW2
381 views
Call of Duty: Modern Warfare II

Portal 2: Co-op - Chapter 2 - Chamber 3
379 views
Portal 2

Bravely Default - Dark Knight Alternis Fight
377 views
Bravely Default

Bravely Default - Holly and Barras Fight
374 views
Bravely Default

Dishonored: House of Pleasure - Silent Golden Cat Entry (Ghost)
372 views
Dishonored

Bravely Default - Ouroboros (Human Form) Fight
371 views
Bravely Default

Grand Theft Auto V - The Blitz Play Heist (Gold Medal)
370 views
Grand Theft Auto V

556 Icarus: The Loadout You SHOULD be Using in MW2
370 views
Call of Duty: Modern Warfare II
Assassin's Creed III: Hidden Underground Peg Leg Trinket 5
366 views
Assassin's Creed III

Portal 2: Co-op - Chapter 5 - Chamber 7
365 views
Portal 2

Final Fantasy XIII-2 - Long Gui Fight
364 views
Final Fantasy XIII-2

Dark Souls II - The Pursuer Fight 2-Hit Kill
364 views
Dark Souls II

Learn how to get a Galarian Meowth
363 views
Pokémon Scarlet & Violet
Deus Ex: Human Revolution - Hugh Darrow eBook 14 - Understanding Vision Part 1
362 views
Deus Ex: Human Revolution
The Legend of Zelda: Skyward Sword - Final Boss Demise Fight
359 views
The Legend of Zelda: Skyward Sword HD

The Legend of Zelda: A Link Between Worlds - Zaganaga Fight
356 views
The Legend of Zelda: A Link Between Worlds

Portal 2: Co-op - Chapter 4 - Chamber 3
352 views
Portal 2
Portal 2: Co-op - Chapter 1 - Chamber 3
351 views
Portal 2
Portal 2: Chapter 6 - Chamber 2
349 views
Portal 2

Portal 2: Co-op - Chapter 3 - Chamber 4
348 views
Portal 2
The Legend of Zelda: Skyward Sword - The Imprisoned Fight (Third Encounter)
348 views
The Legend of Zelda: Skyward Sword HD

Portal 2: Co-op - Chapter 3 - Chamber 2
343 views
Portal 2

Darksiders II - Gorewood Boss Fight
340 views
Darksiders II

Uncharted 4 - Run the Table Trophy (Ch. 8 or 10)
338 views
Uncharted 4: A Thief's End

Portal 2 - Co-op - Chapter 5 - Chamber 5
335 views
Portal 2
Mass Effect 3: Omega DLC - Rampart Mech Battle
335 views
Mass Effect 3 Legendary Edition

Final Fantasy XIII-2 - Ugallu Fight
332 views
Final Fantasy XIII-2

Portal 2: Chapter 8 - Chamber 2
328 views
Portal 2
The Legend of Zelda: Skyward Sword - Ghirahim Fight (Fire Sanctuary)
325 views
The Legend of Zelda: Skyward Sword HD

Pikmin 3 - Sandbelching Meerslug Platinum
325 views
Pikmin 3

Witcher 3: Nithral (Death March) - Wild Hunt = Discount Shelf Boogeymen
324 views
The Witcher 3: Wild Hunt

Grand Theft Auto V - The Big Score Heist: Subtle Approach (Gold Medal)
322 views
Grand Theft Auto V

Portal 2: Chapter 2 - Chamber 8
321 views
Portal 2

Portal 2: Door Prize Achievement
321 views
Portal 2

STALKER 2: Glutton location explained - get the BEST gun in the game
320 views
STALKER 2: Heart of Chornobyl
How to Get A Crappy Way To Die Trophy in CoD MW2
319 views
Call of Duty: Modern Warfare II

Darksiders II - Karkinos Boss Fight
315 views
Darksiders II

Bravely Default - Spell Fencer Ciggma and Time Mage Khamer Fight
315 views
Bravely Default

Tales of Xillia - Devil's Beast Folzam Fight
313 views
Tales of Xillia

Bravely Default - The Evil One (First Form) Fight
313 views
Bravely Default

Make Dosh FAST in Fantasy Life i: The Girl Who Steals Time
313 views
FANTASY LIFE i: The Girl Who Steals Time

The Legend of Zelda: A Link Between Worlds - Octoball Guide
310 views
The Legend of Zelda: A Link Between Worlds
Portal 2: Chapter 3 - Chamber 3
305 views
Portal 2

Uncharted 4 - All Collectibles (Epilogue)
305 views
Uncharted 4: A Thief's End

Darksiders II - Archon Boss Fight
304 views
Darksiders II

Just some terrifying baby Necromorphs in the Dead Space Remake
304 views
Dead Space Remake

Pikmin 3 - The Plasm Wraith Platinum
303 views
Pikmin 3
The Elder Scrolls V: Skyrim - Dwarven Centurion Battle
301 views
The Elder Scrolls V: Skyrim Anniversary Edition
Castlevania: Lords of Shadow - Swamp Troll Fight
300 views
Castlevania: Lords of Shadows

Mass Effect 3 - Rannoch: Finish the Geth Prime
299 views
Mass Effect 3 Legendary Edition

Dishonored: The Loyalists - The Hound Pits Infiltration and Blueprint (Ghost)
298 views
Dishonored

Mass Effect 3: Citadel DLC - Sushi Bar Fight
297 views
Mass Effect 3 Legendary Edition

Bravely Default - The Evil One (Second Form) Fight
297 views
Bravely Default

Portal 2: Chapter 8 - Chamber 1
296 views
Portal 2

Portal 2: Chapter 1 - Chamber 4
292 views
Portal 2

Resident Evil 6 - Leon Campaign: Mutated Deborah Boss Part 1
292 views
Resident Evil 6
Bravely Default - Ninja Kikyo Fight
292 views
Bravely Default

Portal 2: Co-op - Chapter 5 - Chamber 3
289 views
Portal 2

Get RICH QUICK in Metaphor ReFantazio With These Tips
289 views
Metaphor: ReFantazio

Dread Comet Location and Boss Guide
286 views
Final Fantasy XVI

Portal 2: Chapter 2 - Chamber 4
285 views
Portal 2

Portal 2: Co-op - Chapter 5 - Chamber 1
284 views
Portal 2

FF16 Stagger Combo
284 views
Final Fantasy XVI

Mass Effect 3: Citadel DLC - Armax Arena Reaper Charity Challenge
282 views
Mass Effect 3 Legendary Edition

Tales of Xillia - Gaius and Muzet Fight (Final)
280 views
Tales of Xillia

Assassin's Creed III: Hidden Underground Peg Leg Trinket 2
278 views
Assassin's Creed III

Pikmin 3 - Vehemoth Phosbat Platinum
276 views
Pikmin 3

Bravely Default - Automaton Fight
275 views
Bravely Default

Mass Effect 3 - Thessia: Kai Leng Battle
269 views
Mass Effect 3 Legendary Edition

Deus Ex: Human Revolution - Secret Praxis Pack Detroit
266 views
Deus Ex: Human Revolution

Assassin's Creed III: Hidden Underground Peg Leg Trinket 4
266 views
Assassin's Creed III

Deus Ex: Human Revolution - Hugh Darrow eBook 21 - Radical Evolution is a Reality
265 views
Deus Ex: Human Revolution

Witcher 3: Royal Griffin (Death March) - Not Going to Help Geralt Shake That Whole Regicide Thing...
265 views
The Witcher 3: Wild Hunt
Portal 2: Co-op - Chapter 2 - Chamber 6
263 views
Portal 2

5 BEST Pokemon TCG Pocket Mythical Island tips
263 views
Pokémon Trading Card Game Pocket
Assassin's Creed: Revelations - Sequence 4 Memory 6
262 views
Assassin's Creed: Revelations

Bravely Default - Ouroboros (World Destroyer Form) Fight
262 views
Bravely Default

Pokemon X and Y: Gym Leader Viola Battle
259 views
Pokémon: X & Y

Uncharted 4 - Peaceful Resolution Trophy (Ch. 13 & 14)
259 views
Uncharted 4: A Thief's End

Castlevania: Lords of Shadow - Dark Lord of the Lycans Fight
256 views
Castlevania: Lords of Shadows
Primo Geovishap Attacks and Abilities
256 views
Genshin Impact
Mass Effect 3 - Grissom Academy: Orion Hall Atlas Battle
255 views
Mass Effect 3 Legendary Edition

Portal 2: Co-op - Chapter 1 - Chamber 1
254 views
Portal 2
Bravely Default - Performer Praline
254 views
Bravely Default

How to Complete Substory 46 - Scented Water
254 views
Like a Dragon: Ishin
Portal 2: Co-Op - Chapter 3 - Chamber 6
253 views
Portal 2

The Legend of Zelda: Skyward Sword - Ghirahim Fight (Third Encounter)
253 views
The Legend of Zelda: Skyward Sword HD

Pokemon X and Y: Capturing Shiny Pokemon via Chain Fishing
252 views
Pokémon: X & Y

Kingdom Come Deliverance 2 REVIEW - Potential GOTY?
252 views
Kingdom Come: Deliverance II

Pikmin 3 - The Armored Mawdad Platinum Strategy
251 views
Pikmin 3

Metal Gear Solid V: Ground Zeroes - Jamais Vu S-Rank Walkthrough
248 views
Metal Gear Solid V: Ground Zeroes

The Legend of Zelda: Skyward Sword - Moldarach Fight
245 views
The Legend of Zelda: Skyward Sword HD
Final Fantasy XIII-2 - Paradox Alpha Fight
243 views
Final Fantasy XIII-2
How to Get Bond Fragments from Achievements in Fire Emblem Engage
243 views
Fire Emblem Engage

Bravely Default - Summoner Mephilia Fight
241 views
Bravely Default

How to Earn the Rod to Redemption Trophy in Final Fantasy XVI
241 views
Final Fantasy XVI

Witcher 3: Shrieker (Death March) - Surprisingly Not Much Shrieking Involved!
240 views
The Witcher 3: Wild Hunt
Bravely Default - Orthros Fight
239 views
Bravely Default

Final Fantasy XIII-2 - Ultimate Levelling Spot 400AF Academia
236 views
Final Fantasy XIII-2
Mass Effect 3 - Rannoch: Final Geth Server Sphere
235 views
Mass Effect 3 Legendary Edition

The Legend of Zelda: A Link Between Worlds - Knucklemaster Fight
235 views
The Legend of Zelda: A Link Between Worlds

Witcher 3 - The White Lady (Death March) - Why You Shouldn't Try to Plough a Noonwraith
234 views
The Witcher 3: Wild Hunt

The Legend of Zelda: Skyward Sword - Tentalus Fight
231 views
The Legend of Zelda: Skyward Sword HD

Bravely Default - The Jackal Fight
231 views
Bravely Default

The Legend of Zelda: A Link Between Worlds - Gemasaur King Fight
230 views
The Legend of Zelda: A Link Between Worlds

Bravely Default - Valkyrie Einheria Fight
229 views
Bravely Default

Deus Ex: Human Revolution - Hugh Darrow eBook 22 - Brain Implants
228 views
Deus Ex: Human Revolution

How to Unlock the Thing Trophy/Achievement
228 views
Tchia

Portal 2: Chapter 2 - Chamber 7
227 views
Portal 2

Pikmin 3 - Scornet Maestro Platinum
226 views
Pikmin 3

Portal 2: Chapter 3 - Chamber 7
225 views
Portal 2

When The Butcher Surprises You In Diablo 4! #shorts #diablo4
225 views
Diablo IV
Portal 2: Co-op - Chapter 1 - Chamber 2
224 views
Portal 2

Mass Effect 3 - Horizon: Sanctuary Banshee and Brute Battle
224 views
Mass Effect 3 Legendary Edition

Resident Evil 6 - Jake Campaign: Ustanak Part 3
224 views
Resident Evil 6

Dishonored: The Royal Physician - Crossing the Bridge (Ghost)
224 views
Dishonored

The Legend of Zelda: Skyward Sword - Koloktos Fight
224 views
The Legend of Zelda: Skyward Sword HD

Bravely Default - Chairman Profiteur Fight
221 views
Bravely Default
Portal 2: Co-op - Chapter 2 - Chamber 2
220 views
Portal 2

Deus Ex: Human Revolution - Hugh Darrow eBook 1 Neural Interface Protocols - The PEDOT Revolution
220 views
Deus Ex: Human Revolution

Deus Ex: Human Revolution - Namir Boss Strategy
220 views
Deus Ex: Human Revolution

Darksiders II - Construct Hulk Boss Fight
219 views
Darksiders II

Final Fantasy XIII-2 - Caius in Oerba Fight
218 views
Final Fantasy XIII-2

Dishonored: Light at the End - Low Chaos Reaching the Elevator (no kills, Ghost)
218 views
Dishonored
Final Fantasy XIII-2 - Caius in Valhalla Round 2 Fight
217 views
Final Fantasy XIII-2

One of the creepiest things in the Dead Space Remake
217 views
Dead Space Remake

Resident Evil 6 - Leon Campaign: Ustanak Fight
214 views
Resident Evil 6

Final Fantasy XIII-2 - Proto fal'Cie Adam (Paradox Ending) Fight
212 views
Final Fantasy XIII-2

Assassin's Creed III: Hidden Underground Peg Leg Trinket 3
212 views
Assassin's Creed III

Minecraft - Hidden Doors and Redstone Circuit Troubleshooting
212 views
Minecraft

Mass Effect 3: Omega DLC - Reactor Mech Battle
209 views
Mass Effect 3 Legendary Edition
Tales of Xillia - Devil's Beast Gatrega Fight
209 views
Tales of Xillia

Star Ocean: Integrity and Faithlessness - Eitalon Leader Boss Fight - Unimportant First Boss
208 views
Star Ocean: Integrity and Faithlessness

Bravely Default - Victor and Victoria Fight
206 views
Bravely Default

Final Fantasy XIII-2 - Ochu Fight
205 views
Final Fantasy XIII-2
Bravely Default - Templar Braev Lee Fight
205 views
Bravely Default
Portal 2: Wake Up Call Achievement
204 views
Portal 2

Stealth Inc: Sector 1 Chamber 8
204 views
Stealth Inc: A Clone in the Dark
Metal Gear Solid V: Ground Zeroes - Intel Operative Rescue S-Rank Walkthrough
203 views
Metal Gear Solid V: Ground Zeroes

S.T.A.L.K.E.R. 2: Heart of Chornobyl review
203 views
STALKER 2: Heart of Chornobyl

Assassin's Creed III: Sequence 3 mission 3
202 views
Assassin's Creed III

Pikmin 3 - The Quaggled Mireclops Platinum
201 views
Pikmin 3

Animal Crossing: New Leaf - The Money Rock
200 views
Animal Crossing: New Leaf

Watch Dogs - ctOS Breaches
200 views
Watch Dogs

Final Fantasy XIII-2 - Yomi Fight
199 views
Final Fantasy XIII-2

Final Fantasy XIII-2 - Lightning Vs Chaos Bahamut Fight (Round 1)
196 views
Final Fantasy XIII-2

Portal 2: Chapter 3 - Chamber 5
193 views
Portal 2
Portal 2: Co-op - Chapter 4 - Chamber 1
191 views
Portal 2

Bravely Default - Vestment Cave Dragon
190 views
Bravely Default

Assassin's Creed III: Sequence 11 - Mission 1 part 1
189 views
Assassin's Creed III

Assassin's Creed: Revelations - Sequence 3 Memory 8
188 views
Assassin's Creed: Revelations

Portal 2: You Made Your Point Achievement
187 views
Portal 2

The Legend of Zelda: Skyward Sword - The Imprisoned Fight (Second Encounter)
184 views
The Legend of Zelda: Skyward Sword HD

Deus Ex: Human Revolution - Hugh Darrow eBook 23 - Human Powered Autonomous Energy Reclamation
183 views
Deus Ex: Human Revolution
Star Ocean: Integrity and Faithlessness - Protecting Anne (Third Time) - This One is Easy!
183 views
Star Ocean: Integrity and Faithlessness

Animal Crossing: New Leaf - Dealing with Bees
182 views
Animal Crossing: New Leaf

Animal Crossing: New Leaf - The Wetsuit
182 views
Animal Crossing: New Leaf

Transformers: Fall of Cybertron - Chapter XIII: Megatron Vs Optimus Prime
181 views
Transformers: Fall of Cybertron

The Last of Us - Sewer Escape Tips
180 views
The Last of Us Part I

Castlevania: Lords of Shadow - Ogre Fight
180 views
Castlevania: Lords of Shadows

Bravely Default - Black Mage Crowe Fight
180 views
Bravely Default

Portal 2: Chapter 3 - Chamber 8
179 views
Portal 2

Top 5 Diablo IV Characters Of Our Favorite Game Icons, Made With AI #diablo4 #ai #midjourney #shorts
179 views
Diablo IV
Final Fantasy XIII-2 - Lightning and Amodar Coliseum Fight
178 views
Final Fantasy XIII-2

Portal 2: Chapter 4 - Chamber 4
177 views
Portal 2
How to Defeat The Huntress in the Wildwoods
177 views
God of War: Ragnarok

Final Fantasy XIII-2 - Aloeidai Fight
176 views
Final Fantasy XIII-2

Final Fantasy XIII-2 - Immortal Fight
176 views
Final Fantasy XIII-2

Tomb Raider (2013) - Temple of the Hand Maidens Solution (Optional Tomb)
176 views
Tomb Raider: Definitive Edition (2013)

Maxing Out Your Bond With The Frequently Lost Courier
176 views
Like a Dragon: Ishin

Assassin's Creed: Revelations - Sequence 6 Memory 1
173 views
Assassin's Creed: Revelations

Tales of Xillia - Jiao Fight
173 views
Tales of Xillia

Final Fantasy XIII-2 - Omega Weapon Coliseum Fight
173 views
Final Fantasy XIII-2

Portal 2: Portal Conversation Society Achievement
171 views
Portal 2

Final Fantasy XIII-2 - Chaos Bahamut Fight (Final Battle)
171 views
Final Fantasy XIII-2

Castlevania: Lords of Shadow - Black Knight Fight
171 views
Castlevania: Lords of Shadows

Pokemon Black 2 and White 2: Catching Kyurem
170 views
Pokémon: Black & White 2

Portal 2: Co-Op - Chapter 4 - Chamber 5
168 views
Portal 2
Final Fantasy XIII-2 - Caius in Void Beyond Fight
168 views
Final Fantasy XIII-2
Sulphur Farming Route
168 views
Enshrouded
Resident Evil 6 - Leon Campaign: Mutated Deborah Boss Part 2
167 views
Resident Evil 6

Pokémon Sword & Shield: The Crown Tundra: Dynamax Adventures
167 views
Pokémon: Sword & Shield

Assassin's Creed: Revelations - Sequence 4 Memory 5 Galata Tower
163 views
Assassin's Creed: Revelations

Portal 2: Co-op - Chapter 2 - Chamber 1
161 views
Portal 2
Deus Ex: Human Revolution - Hugh Darrow eBook 27 Understanding Vision part 2
161 views
Deus Ex: Human Revolution

Watch Dogs - Privacy Invasions
161 views
Watch Dogs

Darksiders II - Gharn Boss Fight
159 views
Darksiders II

Assassin's Creed III: Sequence 11 mission 1 part 2
159 views
Assassin's Creed III

Mass Effect 3: Citadel DLC - Final Battle
157 views
Mass Effect 3 Legendary Edition

Pokemon Black 2 and White 2: Gym Leader Elesa
157 views
Pokémon: Black & White 2

Uncharted 4 - Just Floor It! Trophy (Ch. 17)
157 views
Uncharted 4: A Thief's End

I Call Shotgun Trophy Short
157 views
Call of Duty: Modern Warfare III

Tales of Xillia - Greater Demon Fight
156 views
Tales of Xillia

Mass Effect 3: Omega DLC - Cerberus Cannon Activation
156 views
Mass Effect 3 Legendary Edition

Pokemon X and Y: Gym Leader Grant Battle
156 views
Pokémon: X & Y
Resident Evil 6 - Chris Campaign: Helicopter Battle (Part 2)
155 views
Resident Evil 6

Pokemon Black 2 and White 2: Catching Zekrom/Reshiram
155 views
Pokémon: Black & White 2

Star Ocean: Integrity and Faithlessness - Niflhel/Niflheim Boss Fight - The Doublemint Armor Twins
155 views
Star Ocean: Integrity and Faithlessness

Transformers: Fall of Cybertron - Chapter XII: Sharpshot Battle
154 views
Transformers: Fall of Cybertron

Dark Souls II - Ruin Sentinels Fight
154 views
Dark Souls II

How to Defeat Mob Enemies
154 views
Gotham Knights

Portal 2: Chapter 3 - Chamber 9
152 views
Portal 2

Assassins Creed: Revelations - Sequence 1 Memory 3
151 views
Assassin's Creed: Revelations

Assassin's Creed III: Peg Leg Sidequest - Dead Chest Island Chase
150 views
Assassin's Creed III

Bravely Default - Swordmaster Kamiizuma Fight
150 views
Bravely Default
Portal 2: Chapter 3 - Chamber 4
149 views
Portal 2

Mass Effect 3: Leviathan DLC - Despoina Power Cell Battle
149 views
Mass Effect 3 Legendary Edition

Pokemon Black 2 and White 2: Gym Leader Skyla
149 views
Pokémon: Black & White 2

Mass Effect 3 - Final Mission: Earth - Missile Battery Attack Wave 3
148 views
Mass Effect 3 Legendary Edition

Pokemon Black 2 and White 2: Gym Leader Burgh
148 views
Pokémon: Black & White 2
Mass Effect 3: Citadel DLC - Retake the Normandy Battle
147 views
Mass Effect 3 Legendary Edition

Bravely Default - Pirate Barbarossa Fight
147 views
Bravely Default

Pokemon Black 2 and White 2: Gym Leader Cheren
147 views
Pokémon: Black & White 2
Portal 2: Chapter 1 - Chamber 1
146 views
Portal 2

Final Fantasy XIII-2 - Zenobia Fight
146 views
Final Fantasy XIII-2

Assassin's Creed III: Sequence 6 Mission 4
145 views
Assassin's Creed III

Metal Gear Solid V: Ground Zeroes - Classified Intel Acquisition S-Rank Walkthrough (Method 2)
145 views
Metal Gear Solid V: Ground Zeroes

Metal Gear Solid V: Ground Zeroes - Destroy the AA Emplacements S-Rank Walkthrough (Method 2)
145 views
Metal Gear Solid V: Ground Zeroes

How to Max Your Bond With the Wood Cutter
145 views
Like a Dragon: Ishin
Portal 2: Co-op - Chapter 3 - Chamber 1
143 views
Portal 2

Uncharted 4 - Marco Polo Returns! Trophy (Chapter 12)
143 views
Uncharted 4: A Thief's End

Mass Effect 3 - Mesana: Great Hall Banshee Battle
142 views
Mass Effect 3 Legendary Edition
Behemoth King Location and Attacks Video Guide
142 views
Final Fantasy XVI

The Legend of Zelda: Skyward Sword - Demon Lord Ghirahim Fight
141 views
The Legend of Zelda: Skyward Sword HD

Portal 2: Pit Boss Achievement
140 views
Portal 2

Deus Ex: Human Revolution - Pacifist Achievement
140 views
Deus Ex: Human Revolution

Assassin's Creed: Revelations - Sequence 3 Memory 10
140 views
Assassin's Creed: Revelations

Resident Evil 6 - Chris Campaign: Ogroman Part 2
140 views
Resident Evil 6
Transformers: Fall of Cybertron - Chapter III: Plaza Assault
139 views
Transformers: Fall of Cybertron

Resident Evil 6 - Ada Campaign: Mutated Carla
138 views
Resident Evil 6

Pokemon Black 2 and White 2: Gym Leader Clay
138 views
Pokémon: Black & White 2

Darksiders II - Corrupted Custodian Boss Fight
137 views
Darksiders II

Portal 2: Chapter 1 - Chamber 3
135 views
Portal 2

Pikmin 3 - Collect Treasure Mission 2 Platinum
134 views
Pikmin 3

Uncharted 4 - Best Score! Trophy (Epilogue)
134 views
Uncharted 4: A Thief's End

Borderlands 2 - Assault on Dragon Keep: Handsome Sorcerer
133 views
Borderlands 2

The Elder Scrolls V: Skyrim - Nahkrin Boss Fight
132 views
The Elder Scrolls V: Skyrim Anniversary Edition

Pokemon Black 2 and White 2: Colress (Plasma Frigate)
132 views
Pokémon: Black & White 2

Assassin's Creed: Revelations - Sequence 7 Memory 4
131 views
Assassin's Creed: Revelations

Deus Ex: Human Revolution - Hugh Darrow eBook 17 Electrogravitic Technology Applications
130 views
Deus Ex: Human Revolution

Castlevania: Lords of Shadow - Deadly Toys Fight
130 views
Castlevania: Lords of Shadows

Pokemon X and Y: Gym Leader Olympia Battle
130 views
Pokémon: X & Y

The Legend of Zelda: Skyward Sword - Scaldera Fight
129 views
The Legend of Zelda: Skyward Sword HD

Find EVERYTHING in Mario Kart World with this trick!
126 views
Mario Kart World

Mass Effect 3 - Grissom Academy: Atrium Open Yard Battle Part 1
125 views
Mass Effect 3 Legendary Edition

Resident Evil 6 - Jake Campaign: Ustanak Part 1
125 views
Resident Evil 6

Tomb Raider (2013) - Hall of Ascension Solution (Optional Tomb)
125 views
Tomb Raider: Definitive Edition (2013)
Tales of Xillia - Ivar (Fight 1)
125 views
Tales of Xillia
Resident Evil 6 - Chris Campaign: Haos Part 1
124 views
Resident Evil 6

Bravely Default - Ranger Artemia Fight
124 views
Bravely Default

Portal 2: Chapter 2 - Chamber 6
122 views
Portal 2
Resident Evil 6 - Ada Campaign: Simmons (Final)
122 views
Resident Evil 6
Portal 2: Chapter 3 - Chamber 6
121 views
Portal 2

Darksiders II - Ice Giant Boss Fight
121 views
Darksiders II

Assassin's Creed III: Sequence 8 Final Mission
121 views
Assassin's Creed III

Pokemon Black 2 and White 2: Gym Leader Roxie
121 views
Pokémon: Black & White 2

Tales of Xillia - Presa and Agria Fight
120 views
Tales of Xillia

Borderlands 2 - Captain Scarlett: H3RL-E
120 views
Borderlands 2

Bravely Default - Knight Heinkel Fight
120 views
Bravely Default
Assassins Creed: Revelations - Sequence 1 Memory 1
119 views
Assassin's Creed: Revelations

Bloodborne - Blood-starved Beast Fight
119 views
Bloodborne
Portal 2: Co-op - Chapter 1 - Chamber 4
117 views
Portal 2

Assassin's Creed III: Brawler Sidequest - The Tournament
117 views
Assassin's Creed III

Uncharted 4 - All Collectibles (Chapter 2)
117 views
Uncharted 4: A Thief's End

Final Fantasy XIII-2 - Lightning vs Chaos Bahamut Fight (Round 2)
116 views
Final Fantasy XIII-2

Final Fantasy XIII-2 - Tile Trial Bresha Ruins 005AF
116 views
Final Fantasy XIII-2

The Legend of Zelda: Skyward Sword - The Imprisoned Fight (First Encounter)
116 views
The Legend of Zelda: Skyward Sword HD

Stealth Inc: Sector 3 Chamber 8
116 views
Stealth Inc: A Clone in the Dark
The Legend of Zelda: A Link Between Worlds - Moldorm Fight
116 views
The Legend of Zelda: A Link Between Worlds

Bloodborne - Father Gascoigne Fight
115 views
Bloodborne

Bloodborne - Darkbeast Paarl Fight
115 views
Bloodborne

Uncharted 4 - All Collectibles (Ch. 20)
115 views
Uncharted 4: A Thief's End

Uncharted 4 - Glamour Shot Trophy (Chapter 11)
115 views
Uncharted 4: A Thief's End

Darksiders II - Gnashor Boss Fight
114 views
Darksiders II
Tales of Xillia - Nachtigal Fight
114 views
Tales of Xillia

Pokemon Black 2 and White 2: Gym Leader Drayden
114 views
Pokémon: Black & White 2
Final Fantasy XIII-2 - Royal Ripeness Fight
113 views
Final Fantasy XIII-2
Mass Effect 3 - Tuchanka: Rescuing the Turian Soldiers
113 views
Mass Effect 3 Legendary Edition

Lachmann Sub: The Loadout You SHOULD be Using in MW2
113 views
Call of Duty: Modern Warfare II

Darksiders II - Jemaerah the Scribe Boss Fight
112 views
Darksiders II

Borderlands 2 - Assault on Dragon Keep: Handsome Dragon
112 views
Borderlands 2

Dark Souls II - Last Giant Fight
112 views
Dark Souls II

Final Fantasy XIII-2 - Twilight Odin Round 2 Fight
111 views
Final Fantasy XIII-2
Resident Evil 6 - Chris Campaign: Haos Part 3
110 views
Resident Evil 6

Tales of Xillia - Alvin Fight
110 views
Tales of Xillia

Bravely Default - Ice Golem Fight
110 views
Bravely Default

Tomb Raider (2013) - Well of Tears Solution (Optional Tomb)
109 views
Tomb Raider: Definitive Edition (2013)

Mass Effect 3: Omega DLC - Phantom Battle
109 views
Mass Effect 3 Legendary Edition

Uncharted 4 - All Collectibles (Ch. 13)
109 views
Uncharted 4: A Thief's End
Borderlands 2 - The Warrior Boss Fight
108 views
Borderlands 2

Castlevania: Lords of Shadow - Mechanical Monstrosity Fight 1
107 views
Castlevania: Lords of Shadows

Watch Dogs - The Loop ctOS Center
107 views
Watch Dogs

Pokemon X and Y: Champion Diantha Battle
106 views
Pokémon: X & Y

Mass Effect 3 - Arrae: AA Gun Rooftop Battle
105 views
Mass Effect 3 Legendary Edition
Mass Effect 3 - Eden Prime: Final Battle
104 views
Mass Effect 3 Legendary Edition

Tales of Xillia - Nameless Anomaly Fight
104 views
Tales of Xillia

Mass Effect 3: Leviathan DLC - Mahavid Reaper Battle
104 views
Mass Effect 3 Legendary Edition

Assassin's Creed IV: Sequence 2 Memory 2 - Where's my Sugar
104 views
Assassin's Creed IV: Black Flag

Bravely Default - Rusalka Fight
104 views
Bravely Default

Metal Gear Solid V: Ground Zeroes - Classified Intel Acquisition S-Rank Walkthrough Method 1
104 views
Metal Gear Solid V: Ground Zeroes
Portal 2: Co-op - Chapter 1 - Chamber 5
103 views
Portal 2

Borderlands 2 - Captain Scarlett: Big Sleep and Sandman
103 views
Borderlands 2

Tales of Xillia - Crimson and Azure Servants Fight
103 views
Tales of Xillia

Uncharted 4 - All Collectibles (Ch. 12)
103 views
Uncharted 4: A Thief's End

Portal 2: Pturretdactyl Achievement
102 views
Portal 2
Portal 2: Triple Crown Achievement
102 views
Portal 2

Assassin's Creed: Revelations - Sequence 8 Memory 3
102 views
Assassin's Creed: Revelations

Mass Effect 3 - N7: Cerberus Fighter Base - Final Battle
102 views
Mass Effect 3 Legendary Edition

Uncharted 4 - Ghost in the Cemetery Trophy (Ch. 8)
102 views
Uncharted 4: A Thief's End

Borderlands 2 - Captain Scarlett: Roscoe
101 views
Borderlands 2

Dark Souls II - Lost Sinner Fight
101 views
Dark Souls II

Uncharted 4 - All Collectibles (Chapter 8)
101 views
Uncharted 4: A Thief's End

Mass Effect 3 - Mars: Final Shootout
100 views
Mass Effect 3 Legendary Edition

Transformers: Fall of Cybertron - Chapter II: Collectibles
100 views
Transformers: Fall of Cybertron

Assassin's Creed: Revelations - Sequence 2 Memory 7
99 views
Assassin's Creed: Revelations

Darksiders II - Avatar of Chaos Boss Fight
99 views
Darksiders II

Stealth Inc: Sector 6 Chamber 3
99 views
Stealth Inc: A Clone in the Dark

Assassin's Creed IV: Sequence 9 Memory 2 - Trust is Earned
99 views
Assassin's Creed IV: Black Flag

Dark Souls II: King Vendrick Fight
99 views
Dark Souls II

Final Fantasy XIII-2 - Royal Ripeness (Full Power) Fight
98 views
Final Fantasy XIII-2
Mass Effect 3 - Menae: Defend the Airfield
98 views
Mass Effect 3 Legendary Edition

Tales of Xillia - Jiao, Wingul and Presa Fight
98 views
Tales of Xillia

Bravely Default - Guardian Fight
98 views
Bravely Default
Uncharted 4 - All Collectibles (Ch. 10)
98 views
Uncharted 4: A Thief's End

Mass Effect 3 - Final Mission: Earth - Missile Battery Attack Wave 2
97 views
Mass Effect 3 Legendary Edition

Transformers: Fall of Cybertron - Chapter X: Trypticon Protection
97 views
Transformers: Fall of Cybertron

Mass Effect 3: Citadel DLC - Market Battle
97 views
Mass Effect 3 Legendary Edition

Assassin's Creed: Revelations - Sequence 1 Memory 5
96 views
Assassin's Creed: Revelations
Vaznev 9K: The Loadout You SHOULD be Using in MW2
96 views
Call of Duty: Modern Warfare II

Mass Effect 3 - Final Mission: Earth - Missile Battery Attack Wave 1
95 views
Mass Effect 3 Legendary Edition
Uncharted 4 - All Collectibles (Chapter 3)
95 views
Uncharted 4: A Thief's End

Minecraft - Red Stone Circuit Repeaters and Doorbells
94 views
Minecraft

Stealth Inc: Sector 8 Chamber 3
93 views
Stealth Inc: A Clone in the Dark

Pokemon X and Y: Gym Leader Korrina Battle
93 views
Pokémon: X & Y

Bloodborne - Cleric Beast Fight
93 views
Bloodborne

Minecraft - Comparator Explanation and Interior Locking
92 views
Minecraft
Fire Emblem: Awakening - Choosing Units
92 views
Fire Emblem: Awakening

Pokemon Black 2 and White 2: Elite Four Shauntal
92 views
Pokémon: Black & White 2

Uncharted 4 - All Collectibles (Ch. 17)
92 views
Uncharted 4: A Thief's End
Resident Evil 6 - Chris Campaign: Ogroman Part 1
91 views
Resident Evil 6

Uncharted 4 - Don't Feed the Animals Trophy (Chapter 11)
91 views
Uncharted 4: A Thief's End

Uncharted 4 - I Can See My House From Here Trophy (Chapter 11)
91 views
Uncharted 4: A Thief's End
Deus Ex: Human Revolution - Hugh Darrow eBook 15 Optical Enhancement Functionality
90 views
Deus Ex: Human Revolution

Final Fantasy XIII-2 - Twilight Odin Round 1 Fight
90 views
Final Fantasy XIII-2

Metal Gear Solid V: Ground Zeroes - Deja Vu S-Rank Walkthrough
90 views
Metal Gear Solid V: Ground Zeroes

The Elder Scrolls V: Skyrim - First Dragon Battle
89 views
The Elder Scrolls V: Skyrim Anniversary Edition
Tales of Xillia - Devil's Beast Melanbron Fight
89 views
Tales of Xillia
Watch Dogs - Missing Person: Crie for yor Dauter
89 views
Watch Dogs

Transformers: Fall of Cybertron - Chapter III: Collectibles
88 views
Transformers: Fall of Cybertron
Resident Evil 6 - Chris Campaign: Haos Part 2
88 views
Resident Evil 6
Pikmin 3 - Collect Treasure Mission 4 Platinum
88 views
Pikmin 3

Tales of Xillia - Brutaur Fight
88 views
Tales of Xillia

Castlevania: Lords of Shadow - Cornell Fight
87 views
Castlevania: Lords of Shadows
The Legend of Zelda: A Link Between Worlds - Margomill Fight
87 views
The Legend of Zelda: A Link Between Worlds

Dark Souls II - Old Dragonslayer Fight
87 views
Dark Souls II

Pokemon Black 2 and White 2: Gym Leader Marlon
87 views
Pokémon: Black & White 2

Uncharted 4 - All Collectibles (Chapter 6)
86 views
Uncharted 4: A Thief's End

Final Fantasy XIII-2 - Pacos Luvulite and Amethyst Fight
84 views
Final Fantasy XIII-2

Resident Evil 6 - Chris Campaign: Haos Part 4
84 views
Resident Evil 6

Borderlands 2 - High Flying Hunter Achievement
83 views
Borderlands 2

Tales of Xillia - Muzet Fight
83 views
Tales of Xillia
Mass Effect 3 - Rannoch: Admiral Koris - Second AA Gun
82 views
Mass Effect 3 Legendary Edition
Transformers Fall of Cybertron - Chapter XI: Internal Affairs Achievement
82 views
Transformers: Fall of Cybertron

Resident Evil 6 - Ada Campaign: Ubistov Part 1
82 views
Resident Evil 6

Borderlands 2 - Captain Scarlett: Leviathan
82 views
Borderlands 2
Tales of Xillia - Gilland and Celsius Fight
82 views
Tales of Xillia
Watch Dogs - QR Codes
82 views
Watch Dogs

Final Fantasy XIII-2 - Raspatil Fight
81 views
Final Fantasy XIII-2

Mass Effect 3 - Attican Traverse: Ravager and Reaper Battle 1
81 views
Mass Effect 3 Legendary Edition

Mass Effect 3 - Rannoch: Admiral Koris - Third AA Gun
81 views
Mass Effect 3 Legendary Edition
Stealth Inc: Sector 6 Chamber 5
80 views
Stealth Inc: A Clone in the Dark

Borderlands 2 - Mr Torgue's Campaign of Carnage: Death Race
80 views
Borderlands 2

Final Fantasy XIII-2 - Gogmagog Fight (Round 1)
79 views
Final Fantasy XIII-2

Pokemon X and Y: Elite Four Malva Battle
79 views
Pokémon: X & Y

Pokemon Black 2 and White 2: Team Plasma Ghetsis
79 views
Pokémon: Black & White 2
Portal 2: Chapter 1 - Chamber 2
78 views
Portal 2
Darksiders II - Basileus and Achidna Boss Fights
78 views
Darksiders II

Uncharted 4 - Still Got It! Trophy (Chapter 4)
78 views
Uncharted 4: A Thief's End

Portal 2: Chapter 2 - Chamber 5
77 views
Portal 2

Uncharted 4 - All Collectibles (Ch. 14)
77 views
Uncharted 4: A Thief's End

Assassin's Creed: Revelations - Sequence 6 Memory 8
76 views
Assassin's Creed: Revelations
Bravely Default - Dragon Zombie Fight
76 views
Bravely Default

Uncharted 4 - All Collectibles (Ch. 21)
76 views
Uncharted 4: A Thief's End

Portal 2: Chapter 2 - Chamber 1
75 views
Portal 2

Stealth Inc: Sector 6 Chamber 4
75 views
Stealth Inc: A Clone in the Dark

Stealth Inc: Sector 7 Chamber 3
75 views
Stealth Inc: A Clone in the Dark

Final Fantasy XIII-2 - Kalavinka Fight
74 views
Final Fantasy XIII-2

The Elder Scrolls V: Skyrim - First Alduin Dragon Battle
74 views
The Elder Scrolls V: Skyrim Anniversary Edition

Darksiders II - Thane Boss Fight
74 views
Darksiders II

Animal Crossing: New Leaf - Earning Medals
74 views
Animal Crossing: New Leaf
Bravely Default - Land Turtle Fight
74 views
Bravely Default

Pokemon X and Y: Gym Leader Wulfric Battle
74 views
Pokémon: X & Y

Final Fantasy XIII-2 - Caius in Dying World Fight
73 views
Final Fantasy XIII-2

The Elder Scrolls V: Skyrim - Dragon Sahloknir Battle
73 views
The Elder Scrolls V: Skyrim Anniversary Edition

Stealth Inc: Sector 5 Chamber 8
73 views
Stealth Inc: A Clone in the Dark

Tales of Xillia - Devil's Beast Dranzort Fight
73 views
Tales of Xillia

Pokemon X and Y: Legendary Pokemon - Capturing Zygarde
73 views
Pokémon: X & Y

Uncharted 4 - Not a Cairn in the World Trophy (Ch. 10)
73 views
Uncharted 4: A Thief's End

Stealth Inc: Sector 7 Chamber 2
72 views
Stealth Inc: A Clone in the Dark

Watch Dogs - Pawnee ctOS Center
72 views
Watch Dogs
Uncharted 4 - All Collectibles (Ch. 18)
72 views
Uncharted 4: A Thief's End

Final Fantasy XIII-2 - Gogmagog Fight (Round 2)
71 views
Final Fantasy XIII-2

Final Fantasy XIII-2 - Atlas Fight (Weakened)
71 views
Final Fantasy XIII-2
Final Fantasy XIII-2 - Proto fal'Cie Adam (Round 1)
71 views
Final Fantasy XIII-2

Mass Effect 3 - Grissom Academy: Atrium Open Yard Battle Part 2
71 views
Mass Effect 3 Legendary Edition
Mass Effect 3 - N7: Fuel Reactors - Restarting the Reactor
71 views
Mass Effect 3 Legendary Edition
Darksiders II - War Boss Fight
71 views
Darksiders II
Dark Souls II: The Rotten Fight
71 views
Dark Souls II
Portal 2: Chapter 2 - Chamber 2
70 views
Portal 2
Portal 2: Co-op - Chapter 3 - Chamber 3
70 views
Portal 2

Mass Effect 3 - N7: Cerberus Lab Final Assault
70 views
Mass Effect 3 Legendary Edition

Assassin's Creed IV: Sequence 3 Memory 7 - A Single Madman
70 views
Assassin's Creed IV: Black Flag

Dark Souls II: Throne Defender and Watcher Fight
70 views
Dark Souls II

Transformers: Fall of Cybertron - Chapter XI: Hardshell Battle
69 views
Transformers: Fall of Cybertron

Resident Evil 6 - Jake Campaign: Ustanak Part 2
69 views
Resident Evil 6

Pokemon X and Y: Gym Leader Clemont Battle
69 views
Pokémon: X & Y

Assassin's Creed: Revelations - Sequence 4 Memory 3
68 views
Assassin's Creed: Revelations

Dark Souls II: Nashandra Fight
68 views
Dark Souls II

Assassin's Creed: Revelations - Sequence 3 Memory 2
67 views
Assassin's Creed: Revelations
Final Fantasy XIII-2 - Caius in Valhalla Round 1 Fight
67 views
Final Fantasy XIII-2

Mass Effect 3 - Tuchanka: Bomb Final Stand
67 views
Mass Effect 3 Legendary Edition

Tales of Xillia - Agria Fight
67 views
Tales of Xillia
Tales of Xillia - Maxwell Fight (Part 1)
67 views
Tales of Xillia

The Legend of Zelda: A Link Between Worlds - Stalblind Fight
67 views
The Legend of Zelda: A Link Between Worlds

Pokemon X and Y: Elite Four Siebold Battle
67 views
Pokémon: X & Y

Uncharted 4 - All Collectibles (Ch. 16)
67 views
Uncharted 4: A Thief's End

Deus Ex: Human Revolution - Hugh Darrow eBook 25 Vagus Nerve Stimulators Repurposing the Technology
66 views
Deus Ex: Human Revolution
Castlevania: Lords of Shadow - Gravedigger Fight
66 views
Castlevania: Lords of Shadows

Tales of Xillia - Gaius Fight
66 views
Tales of Xillia

Pokemon X and Y: Legendary Pokemon - Capturing Xerneas/Yveltal
66 views
Pokémon: X & Y

Portal 2: Chapter 1 - Chamber 6
65 views
Portal 2
Final Fantasy XIII-2 - Proto fal'Cie Adam Fight (Round 2)
65 views
Final Fantasy XIII-2

Transformers: Fall of Cybertron - Chapter XIII: Bruticus Battle
65 views
Transformers: Fall of Cybertron

Pikmin 3 - Collect Treasure Mission 1 Platinum
65 views
Pikmin 3

Bloodborne - Vicar Amelia Fight
65 views
Bloodborne

Assassin's Creed: Revelations - Sequence 4 Memory 1 Part 1
64 views
Assassin's Creed: Revelations

The Legend of Zelda: A Link Between Worlds - Dharkstare Fight
64 views
The Legend of Zelda: A Link Between Worlds

Dark Souls II: Velstadt - The Royal Aegis Fight
64 views
Dark Souls II

Final Fantasy XIII-2 - Faeryl Wrathwyrm Fight
63 views
Final Fantasy XIII-2

Borderlands 2 - Assault on Dragon Keep: Gold Golem
63 views
Borderlands 2
Dark Souls II: Smelter Demon Fight
63 views
Dark Souls II

Mass Effect 3 - Cerberus HQ: Kai Leng Battle
62 views
Mass Effect 3 Legendary Edition

Mass Effect 3: Leviathan DLC - Dig Site Battle
62 views
Mass Effect 3 Legendary Edition

Assassin's Creed: Revelations - Sequence 2 Memory 4
61 views
Assassin's Creed: Revelations
Final Fantasy XIII-2 - Gogmagog Fight (Round 3)
61 views
Final Fantasy XIII-2
Darksiders II - The Tormentor Mini Boss Fight
61 views
Darksiders II
Castlevania: Lords of Shadow - Commander Olrox Fight
61 views
Castlevania: Lords of Shadows

Pokemon X and Y: Legendary Pokemon - Capturing Mewtwo
61 views
Pokémon: X & Y

Watch Dogs - The Wards ctOS Center
61 views
Watch Dogs

Bloodborne - Yharnam Sunrise Ending
61 views
Bloodborne

Portal 2: Drop Box Achievement
60 views
Portal 2

Assassin's Creed: Revelations - Sequence 2 Memory 5
60 views
Assassin's Creed: Revelations

Assassins Creed: Revelations - Piri Reis Smoke Screen
60 views
Assassin's Creed: Revelations

Pikmin 3 - Collect Treasure Mission 5 Platinum
60 views
Pikmin 3

Assassin's Creed: Revelations - Sequence 8 Memory 1
59 views
Assassin's Creed: Revelations
Stealth Inc: Sector 8 Chamber 8
59 views
Stealth Inc: A Clone in the Dark
The Elder Scrolls V: Skyrim - Final Alduin Battle
58 views
The Elder Scrolls V: Skyrim Anniversary Edition

Mass Effect 3: Leviathan DLC - Despoina Reaper Battle
58 views
Mass Effect 3 Legendary Edition

The Legend of Zelda: A Link Between Worlds - Grinexx Fight
58 views
The Legend of Zelda: A Link Between Worlds

Watch Dogs - ctOS Towers
58 views
Watch Dogs

Bloodborne - Ebrietas: Daughter of the Cosmos Fight
58 views
Bloodborne
The Tricephalic Terror, Gorgimera Location and Hunt Guide
58 views
Final Fantasy XVI

Portal 2: Chapter 1: End of Chapter
57 views
Portal 2
Assassins Creed: Revelations - Sequence 1 Memory 1
57 views
Assassin's Creed: Revelations

Stealth Inc: Sector 8 Chamber 7
57 views
Stealth Inc: A Clone in the Dark

Borderlands 2 - Mr Torgue's Campaign of Carnage: Badassasaurus
57 views
Borderlands 2

Dark Souls II: The Duke's Dear Freja Fight
57 views
Dark Souls II

Stealth Inc: Sector 2 Chamber 8
56 views
Stealth Inc: A Clone in the Dark
Uncharted 4 - All Collectibles (Ch. 19)
56 views
Uncharted 4: A Thief's End

Assassin's Creed: Revelations - Iron Curtain Trophy
55 views
Assassin's Creed: Revelations

Portal 2: Smash TV Achievement
54 views
Portal 2

Assassin's Creed: Revelations - Ishak Pasha Memoir Page 4
54 views
Assassin's Creed: Revelations

Stealth Inc: Sector 4 Chamber 6
54 views
Stealth Inc: A Clone in the Dark

Pokemon X and Y: Gym Leader Ramos Battle
54 views
Pokémon: X & Y

Pokemon Black 2 and White 2: Champion Iris
54 views
Pokémon: Black & White 2

Portal 2: Chapter 1 - Chamber 5
53 views
Portal 2
Portal 2: No Hard Feelings Achievement
53 views
Portal 2

Assassin's Creed: Revelations - Sequence 6 Memory 3
53 views
Assassin's Creed: Revelations

Assassin's Creed: Revelations - Sequence 7 Memory 6
53 views
Assassin's Creed: Revelations
Darksiders II - The Wailing Host Boss Fight
53 views
Darksiders II
Stealth Inc: Sector 1 Chamber 9
53 views
Stealth Inc: A Clone in the Dark

Dark Souls II: Old Iron King Fight
53 views
Dark Souls II

Watch Dogs - Mad Mile ctOS Center
53 views
Watch Dogs

Castlevania: Lords of Shadow - Scarecrow Fight
53 views
Castlevania: Lords of Shadows

Stealth Inc: Sector 1 Chamber 6
52 views
Stealth Inc: A Clone in the Dark
Stealth Inc: Sector 2 Chamber 2
52 views
Stealth Inc: A Clone in the Dark

Bloodborne - The One Reborn Fight
52 views
Bloodborne
Uncharted 4 - All Collectibles (Chapter 9)
52 views
Uncharted 4: A Thief's End

Assassins Creed: Revelations - Piri Reis Caltrops
51 views
Assassin's Creed: Revelations

Borderlands 2 - Wilhelm Fight
51 views
Borderlands 2
Assassin's Creed IV: Sequence 2 Memory 5 - Claiming What's Due
51 views
Assassin's Creed IV: Black Flag
Uncharted 4 - All Collectibles (Ch. 15)
50 views
Uncharted 4: A Thief's End

Transformers: Fall of Cybertron - Chapter V: Escape from Destruction
49 views
Transformers: Fall of Cybertron

Stealth Inc: Sector 2 Chamber 6
49 views
Stealth Inc: A Clone in the Dark

Castlevania: Lords of Shadow - Mechanical Monstrosity Fight 2
49 views
Castlevania: Lords of Shadows

Tales of Xillia - Fire Teagle Fight
49 views
Tales of Xillia

Pokemon X and Y: Elite Four Wikstrom Battle
48 views
Pokémon: X & Y
Assassin's Creed: Revelations - Sequence 3 Memory 1
47 views
Assassin's Creed: Revelations

Final Fantasy XIII-2 - Proto fal'Cie Adam Fight (Round 3)
47 views
Final Fantasy XIII-2

Resident Evil 6 - Leon Campaign: Simmons (Part 2)
47 views
Resident Evil 6

Stealth Inc: Sector 1 Chamber 1
47 views
Stealth Inc: A Clone in the Dark
Stealth Inc: Sector 2 Chamber 7
47 views
Stealth Inc: A Clone in the Dark

Castlevania: Lords of Shadow - Carmilla Fight
47 views
Castlevania: Lords of Shadows

Assassin's Creed: Revelations - Sequence 5 Memory 4
46 views
Assassin's Creed: Revelations

Mass Effect 3 - N7: Cerberus Attack - Return to the Control Room
46 views
Mass Effect 3 Legendary Edition
Resident Evil 6 - Jake Campaign: Chopper Part 1
46 views
Resident Evil 6
Stealth Inc: Sector 3 Chamber 10
46 views
Stealth Inc: A Clone in the Dark
Portal 2: Schrodinger's Catch Achievement
45 views
Portal 2

Mass Effect 3 - Menae: Protecting the Primarch
45 views
Mass Effect 3 Legendary Edition
Stealth Inc: Sector 7 Chamber 6
45 views
Stealth Inc: A Clone in the Dark

Castlevania: Lords of Shadow - The Crow Witch Fight
45 views
Castlevania: Lords of Shadows

Pokemon Black 2 and White 2: Elite Four Grimsley
45 views
Pokémon: Black & White 2

Graphorn Boss Battle
45 views
Hogwarts Legacy

Mass Effect 3 - Grissom Academy: Final Battle
44 views
Mass Effect 3 Legendary Edition

Borderlands 2 - Boom Bewm Fight
44 views
Borderlands 2

Stealth Inc: Sector 3 Chamber 6
44 views
Stealth Inc: A Clone in the Dark

Stealth Inc: Sector 8 Chamber 6
44 views
Stealth Inc: A Clone in the Dark

Castlevania: Lords of Shadow - Lieutenant Brauner Fight
44 views
Castlevania: Lords of Shadows
Dark Souls II: Prowling Magus and Congregation Fight
44 views
Dark Souls II
Transformers: Fall of Cybertron - Chapter XI: Collectibles
43 views
Transformers: Fall of Cybertron

Borderlands 2 - Mr Torgue's Campaign of Carnage: Motor Mamma
43 views
Borderlands 2

Uncharted 4 - All Collectibles (Ch. 11)
42 views
Uncharted 4: A Thief's End

Genshin Impact: Wind Chaser Day One
42 views
Genshin Impact

Transformers: Fall of Cybertron - Chapter XII: Meltdown Escape
41 views
Transformers: Fall of Cybertron

Resident Evil 6 - Leon Campaign: Simmons (Part 3)
41 views
Resident Evil 6

Stealth Inc: Sector 3 Chamber 5
41 views
Stealth Inc: A Clone in the Dark

Stealth Inc: Sector 5 Chamber 2
41 views
Stealth Inc: A Clone in the Dark
Dark Souls II: Covetous Demon Fight
41 views
Dark Souls II

Stealth Inc: Sector 1 Chamber 2
40 views
Stealth Inc: A Clone in the Dark

Stealth Inc: Sector 4 Chamber 1
40 views
Stealth Inc: A Clone in the Dark

Tales of Xillia - Spyrix Warriors Fight
40 views
Tales of Xillia

Borderlands 2 - Mr Torgue's Campaign of Carnage: Pyro Pete
40 views
Borderlands 2

Watch Dogs - Brandon Docks ctOS Center
40 views
Watch Dogs

Bloodborne - Rom the Vacuous Spider Fight
40 views
Bloodborne
Bloodborne - Martyr Logarius Fight
40 views
Bloodborne

Deus Ex: Human Revolution - Unforeseen Consequence Achievement Trophy
39 views
Deus Ex: Human Revolution
Assassin's Creed: Revelations - Sequence 6 Memory 6
39 views
Assassin's Creed: Revelations

Assassin's Creed: Revelations - Sequence 7 Memory 2
39 views
Assassin's Creed: Revelations

Assassins Creed: Revelations - Piri Reis Sticky Situations
39 views
Assassin's Creed: Revelations

Resident Evil 6 - Ada Campaign: Simmons
39 views
Resident Evil 6

Tales of Xillia - Devil's Beast Roparade Fight
39 views
Tales of Xillia
Dark Souls II: Executioner's Chariot Fight
39 views
Dark Souls II

Bloodborne - Micolash: Host of Nightmares Fight
39 views
Bloodborne

Assassin's Creed: Revelations - Sequence 7 Memory 1
38 views
Assassin's Creed: Revelations
Mass Effect 3 - N7: Communication Hub - Third Hacking Device
38 views
Mass Effect 3 Legendary Edition

Pokemon Black 2 and White 2: Elite Four Caitlin
38 views
Pokémon: Black & White 2

Bloodborne - The Witch of Hemwick Fight
38 views
Bloodborne

Bloodborne - Childhood's Beginning Ending
37 views
Bloodborne
Portal 2: Door Prize Achievement
36 views
Portal 2
Portal 2: Final Transmission Achievement
36 views
Portal 2

Stealth Inc: Sector 1 Chamber 3
36 views
Stealth Inc: A Clone in the Dark
Stealth Inc: Sector 3 Chamber 4
36 views
Stealth Inc: A Clone in the Dark
Stealth Inc: Sector 7 Chamber 1
36 views
Stealth Inc: A Clone in the Dark

Stealth Inc: Sector 8 Chamber 4
36 views
Stealth Inc: A Clone in the Dark

Stealth Inc: Sector 8 Chamber 9
36 views
Stealth Inc: A Clone in the Dark

Assassin's Creed IV: Sequence 7 Memory 1 - We Demand a Parlay
36 views
Assassin's Creed IV: Black Flag

Bloodborne - Mergo's Wet Nurse Fight
36 views
Bloodborne
Transformers: Fall of Cybertron - Chapter IX: Collectibles
35 views
Transformers: Fall of Cybertron

Stealth Inc: Sector 6 Chamber 6
35 views
Stealth Inc: A Clone in the Dark

Castlevania: Lords of Shadow - Silver Warrior Fight
35 views
Castlevania: Lords of Shadows

Assassin's Creed: Revelations - Sequence 4 Memory 1 Part 2
34 views
Assassin's Creed: Revelations

Assassin's Creed: Revelations - Sequence 6 Memory 2
34 views
Assassin's Creed: Revelations

Assassin's Creed: Revelations - Sequence 7 Memory 3
34 views
Assassin's Creed: Revelations

Stealth Inc: Sector 4 Chamber 10
34 views
Stealth Inc: A Clone in the Dark

Stealth Inc: Sector 6 Chamber 8
34 views
Stealth Inc: A Clone in the Dark

Stealth Inc: Sector 6 Chamber 9
34 views
Stealth Inc: A Clone in the Dark
Assassin's Creed: Revelations - Piri Reis Tripwire
33 views
Assassin's Creed: Revelations

Final Fantasy XIII-2 - Crystal Bonds Oerba 200AF
33 views
Final Fantasy XIII-2

Minecraft - Surviving Your First Day
33 views
Minecraft

Minecraft - Building a Pixel Sprite Statue
33 views
Minecraft
Stealth Inc: Sector 4 Chamber 5
33 views
Stealth Inc: A Clone in the Dark

Stealth Inc: Sector 7 Chamber 5
33 views
Stealth Inc: A Clone in the Dark

Castlevania: Lords of Shadow - Dark Lord Carmilla Fight
33 views
Castlevania: Lords of Shadows

Pikmin 3 - Collect Treasure Mission 3 Platinum
33 views
Pikmin 3
Tales of Xillia - Hammerzamm Fight (Part 2)
33 views
Tales of Xillia

Assassin's Creed: Revelations - Sequence 5 Memory 6
32 views
Assassin's Creed: Revelations

Assassin's Creed: Revelations - Sequence 6 Memory 7
32 views
Assassin's Creed: Revelations

Assassin's Creed: Revelations - Sequence 8 Memory 2
32 views
Assassin's Creed: Revelations
Mass Effect 3 - Dreadnought: Escaping the Drive Core
32 views
Mass Effect 3 Legendary Edition

Transformers: Fall of Cybertron - Chapter VII: Collectibles
32 views
Transformers: Fall of Cybertron

Stealth Inc: Sector 1 Chamber 4
32 views
Stealth Inc: A Clone in the Dark

Castlevania: Lords of Shadow - Evil Butcher Fight
32 views
Castlevania: Lords of Shadows
Pikmin 3 - Battle Enemies Mission 4 Platinum
32 views
Pikmin 3

Borderlands 2 - Mr Torgue's Campaign of Carnage: Piston's Airship
32 views
Borderlands 2

Pokemon X and Y: Elite Four Drasna Battle
32 views
Pokémon: X & Y

Portal 2: Chapter 2 - Chamber 3
31 views
Portal 2

Darksiders II - Phariseer Boss Fight
31 views
Darksiders II
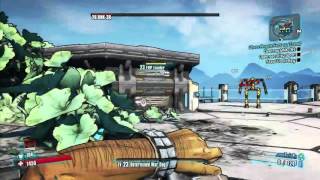
Borderlands 2 - BNK-3R Boss Fight
31 views
Borderlands 2

Stealth Inc: Sector 1 Chamber 10
31 views
Stealth Inc: A Clone in the Dark
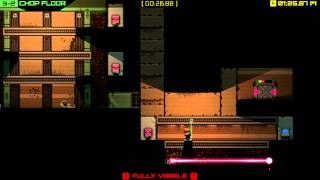
Stealth Inc: Sector 3 Chamber 2
31 views
Stealth Inc: A Clone in the Dark

Stealth Inc: Sector 4 Chamber 8
31 views
Stealth Inc: A Clone in the Dark

Stealth Inc: Sector 5 Chamber 9
31 views
Stealth Inc: A Clone in the Dark
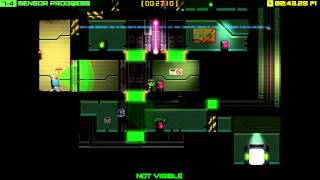
Stealth Inc: Sector 7 Chamber 4
31 views
Stealth Inc: A Clone in the Dark
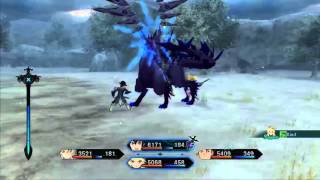
Tales of Xillia - Devil's Beast Schiewiss Fight
31 views
Tales of Xillia

Dark Souls II: Skeleton Lords Fight
31 views
Dark Souls II

Deus Ex: Human Revolution - Hugh Darrow eBook 6 - The Visual Cortex 2.0 - The Eye Redesigned
30 views
Deus Ex: Human Revolution

Transformers: Fall of Cybertron - Chapter IV: Collectibles
30 views
Transformers: Fall of Cybertron
Transformers: Fall of Cybertron - Chapter X: Collectibles
30 views
Transformers: Fall of Cybertron
Stealth Inc: Sector 5 Chamber 4
30 views
Stealth Inc: A Clone in the Dark

Pikmin 3 - Battle Enemies Mission 1 Platinum
30 views
Pikmin 3

Assassin's Creed: Revelations - Sequence 3 Memory 9
29 views
Assassin's Creed: Revelations

Assassin's Creed: Revelations - Sequence 7 Memory 5
29 views
Assassin's Creed: Revelations

Stealth Inc: Sector 2 Chamber 3
29 views
Stealth Inc: A Clone in the Dark

Tales of Xillia - Maxwell Fight (Part 2)
29 views
Tales of Xillia

Portal 2: Preservation of Mass Achievement
28 views
Portal 2
Resident Evil 6 - Jake Campaign: Ubistvo Part 1
28 views
Resident Evil 6

Pikmin 3 - Battle Enemies Mission 5 Platinum
28 views
Pikmin 3
Dark Souls II: Mytha the Baneful Queen Fight
28 views
Dark Souls II

Genshin Impact: Hyakunin Ikki 3.1
28 views
Genshin Impact

Borderlands 2 - Bad Maw Fight
27 views
Borderlands 2

Stealth Inc: Sector 2 Chamber 5
27 views
Stealth Inc: A Clone in the Dark

Stealth Inc: Sector 4 Chamber 7
27 views
Stealth Inc: A Clone in the Dark

Stealth Inc: Sector 5 Chamber 6
27 views
Stealth Inc: A Clone in the Dark

Stealth Inc: Sector 8 Chamber 1
27 views
Stealth Inc: A Clone in the Dark

Stealth Inc: Sector 8 Chamber 2
27 views
Stealth Inc: A Clone in the Dark

Tales of Xillia - Pterobronc Fight
27 views
Tales of Xillia

Tales of Xillia - Presa and Agrea
27 views
Tales of Xillia

Dark Souls II: Scorpioness Najka Fight
27 views
Dark Souls II

Portal 2 - Overclocker Achievement
26 views
Portal 2

Final Fantasy XIII-2 - Mutantomato Fight
26 views
Final Fantasy XIII-2

Resident Evil 6 - Jake Campaign: Ustanak Part 4
26 views
Resident Evil 6

Stealth Inc: Sector 5 Chamber 1
26 views
Stealth Inc: A Clone in the Dark

Stealth Inc: Sector 5 Chamber 7
26 views
Stealth Inc: A Clone in the Dark

Tales of Xillia - Volt Fight
26 views
Tales of Xillia

Pokemon Black 2 and White 2: Elite Four Marshal
26 views
Pokémon: Black & White 2

Assassin's Creed: Revelations - Sequence 5 Memory 2
25 views
Assassin's Creed: Revelations

Mass Effect 3 - Sur'Kesh: Checkpoint Two Pod
25 views
Mass Effect 3 Legendary Edition

Mass Effect 3 - Sur'Kesh: Final Checkpoint
25 views
Mass Effect 3 Legendary Edition

Darksiders II - Sammael Boss Fight
25 views
Darksiders II
Resident Evil 6 - Ada Campaign: Simmons (Final)
25 views
Resident Evil 6

Resident Evil 6 - Jake Campaign: Ustanak Part 5
25 views
Resident Evil 6
Stealth Inc: Sector 2 Chamber 10
25 views
Stealth Inc: A Clone in the Dark

Stealth Inc: Sector 6 Chamber 7
25 views
Stealth Inc: A Clone in the Dark

Stealth Inc: Sector 7 Chamber 9
25 views
Stealth Inc: A Clone in the Dark

Stealth Inc: Sector 8 Chamber 5
25 views
Stealth Inc: A Clone in the Dark

The Legend of Zelda: A Link Between Worlds - Arghhus Fight
25 views
The Legend of Zelda: A Link Between Worlds

Uncharted 4 - All Collectibles (Ch. 22)
25 views
Uncharted 4: A Thief's End

Resident Evil 6 - Jake Campaign: Ubistvo Part 2
24 views
Resident Evil 6

Stealth Inc: Sector 1 Chamber 7
24 views
Stealth Inc: A Clone in the Dark

Stealth Inc: Sector 3 Chamber 7
24 views
Stealth Inc: A Clone in the Dark
Stealth Inc: Sector 7 Chamber 10
24 views
Stealth Inc: A Clone in the Dark

Tales of Xillia - Aquadragons Fight
24 views
Tales of Xillia

Mass Effect 3 - Sur'Kesh: Checkpoint One Pod
23 views
Mass Effect 3 Legendary Edition

Transformers: Fall of Cybertron - Chapter VI: Collectibles
23 views
Transformers: Fall of Cybertron
Transformers: Fall of Cybertron - Chapter XII: Collectibles
23 views
Transformers: Fall of Cybertron
Stealth Inc: Sector 4 Chamber 9
23 views
Stealth Inc: A Clone in the Dark
Tales of Xillia - Wingul Fight (Part 3)
23 views
Tales of Xillia

Deus Ex: Human Revolution - Hugh Darrow eBook 26 Dermal Modification Processes
22 views
Deus Ex: Human Revolution

Transformers: Fall of Cybertron - Chapter V: Collectibles
22 views
Transformers: Fall of Cybertron
Transformers: Fall of Cybertron - Chapter VI: Titan Battle and Escape
21 views
Transformers: Fall of Cybertron

Resident Evil 6 - Leon Campaign: Simmons (Part 1)
21 views
Resident Evil 6

Resident Evil 6 - Leon Campaign: Simmons (Part 4)
21 views
Resident Evil 6
Bloodborne - Shadow of Yharnam Fight
21 views
Bloodborne

Resident Evil 6 - Jake Campaign: Ustanak Finale
20 views
Resident Evil 6
Stealth Inc: Sector 2 Chamber 4
20 views
Stealth Inc: A Clone in the Dark

Stealth Inc: Sector 3 Chamber 3
20 views
Stealth Inc: A Clone in the Dark

Stealth Inc: Sector 5 Chamber 10
20 views
Stealth Inc: A Clone in the Dark

Stealth Inc: Sector 7 Chamber 7
20 views
Stealth Inc: A Clone in the Dark

Stealth Inc: Sector 8 Chamber 10
20 views
Stealth Inc: A Clone in the Dark
Bloodborne - Celestial Emissary Fight
20 views
Bloodborne

Assassins Creed: Revelations - Piri Reis Datura
19 views
Assassin's Creed: Revelations

Transformers: Fall of Cybertron - Chapter V: Gas Leak Run
19 views
Transformers: Fall of Cybertron

Resident Evil 6 - Ada Campaign: Ubistov Part 2
19 views
Resident Evil 6

Borderlands 2 - Bloodwing Fight
19 views
Borderlands 2

Assassin's Creed: Revelations - Sequence 4 Memory 2
18 views
Assassin's Creed: Revelations

Assassin's Creed: Revelations - Piri Reis Thunder
18 views
Assassin's Creed: Revelations
Stealth Inc: Sector 2 Chamber 9
18 views
Stealth Inc: A Clone in the Dark

Stealth Inc: Sector 4 Chamber 2
18 views
Stealth Inc: A Clone in the Dark
Stealth Inc: Sector 4 Chamber 3
18 views
Stealth Inc: A Clone in the Dark

Stealth Inc: Sector 6 Chamber 2
18 views
Stealth Inc: A Clone in the Dark

Stealth Inc: Sector 6 Chamber 10
18 views
Stealth Inc: A Clone in the Dark

Borderlands 2 - Build Buster Achievement
17 views
Borderlands 2
Pikmin 3 - Battle Enemies Mission 2 Platinum
17 views
Pikmin 3

Darksiders II - Bone Keeper and Giant Boss Fights
16 views
Darksiders II

Resident Evil 6 - Jake Campaign: Ubistvo Part 3
16 views
Resident Evil 6

Assassin's Creed: Revelations - Sequence 2 Memory 1
15 views
Assassin's Creed: Revelations

Stealth Inc: Sector 3 Chamber 1
15 views
Stealth Inc: A Clone in the Dark

Stealth Inc: Sector 6 Chamber 1
15 views
Stealth Inc: A Clone in the Dark

Dark Souls II: Ancient Dragon Fight
15 views
Dark Souls II
Assassin's Creed: Revelations - Sequence 5 Memory 3
14 views
Assassin's Creed: Revelations

Darksiders II - The Noss Mini Boss Fight
14 views
Darksiders II

Pikmin 3 - Battle Enemies Mission 3 Platinum
14 views
Pikmin 3

Tales of Xillia - Guide Trailer
14 views
Tales of Xillia
Bloodborne - Amygdala Fight
14 views
Bloodborne

Borderlands 2 - Weapon Efficiency Demonstration
11 views
Borderlands 2

Stealth Inc: Sector 5 Chamber 5
11 views
Stealth Inc: A Clone in the Dark

Stealth Inc: Sector 4 Chamber 4
10 views
Stealth Inc: A Clone in the Dark

Assassin's Creed: Revelations - Sequence 5 Memory 1 Part 1
9 views
Assassin's Creed: Revelations
Assassin's Creed: Revelations - Sequence 5 Memory 1 Part 2
9 views
Assassin's Creed: Revelations

Mass Effect 3 - Attican Traverse: Main Chamber Battle
9 views
Mass Effect 3 Legendary Edition
Stealth Inc: Sector 1 Chamber 6
9 views
Stealth Inc: A Clone in the Dark

Assassin's Creed: Revelations - Ishak Pasha Memoir Page 2
9 views
Assassin's Creed: Revelations

Assassin's Creed: Revelations - Ishak Pasha Memoir Page 3
7 views
Assassin's Creed: Revelations

Assassins Creed: Revelations - Piri Reis Smoke Decoy
7 views
Assassin's Creed: Revelations
Dark Souls II: Belfry Gargoyles Fight
7 views
Dark Souls II
Transformers: Fall of Cybertron - Chapter VII: Collectibles
6 views
Transformers: Fall of Cybertron

Resident Evil 6 - Ada Campaign: Ubistov Part 3
6 views
Resident Evil 6

Assassin's Creed: Revelations - Memoir Page 1
6 views
Assassin's Creed: Revelations

Dark Souls II: Dragonrider Fight
4 views
Dark Souls II

Assassin's Creed: Revelations - Cistern
4 views
Assassin's Creed: Revelations
Mass Effect 3 - Attican Traverse: Main Chamber Battle
3 views
Mass Effect 3 Legendary Edition
Darksiders II - Bone Keeper and Giant Boss Fights
1 views
Darksiders II
How to Find the Mossy Key
Grounded
How to Find the Mossy Key
Grounded
Where to Find All Batarangs in Gotham Heights
Gotham Knights
Where to Find All Batarangs in Gotham Heights
Gotham Knights
MW2 TAQ-56 Loadout Gameplay
Call of Duty: Modern Warfare II
M4: The Loadout You SHOULD be Using in MW2
Call of Duty: Modern Warfare II
Nightwings Best Combos
Gotham Knights
STB 556: The Loadout You SHOULD be Using in MW2
Call of Duty: Modern Warfare II
How to Open the Rond of Affliction Legendary Chest
God of War: Ragnarok
How to Kill the Loot Lizard at Modvitnir's Rig
God of War: Ragnarok
How to Kill the Loot Lizard on Dragon Beach
God of War: Ragnarok
How to Kill the Loot Lizard in The Below
God of War: Ragnarok
How to Kill the Loot Lizard in The Burrows
God of War: Ragnarok
How to Kill the Loot Lizard in the Western Plains of The Crater, Vanaheim
God of War: Ragnarok
All Three Stone Eagles From One Location
Sniper Elite 5
All Three Stone Eagles From One Location
Sniper Elite 5
All Three Stone Eagles From One Location
Sniper Elite 5
How to Survive the Chainsaw Man in RE4
Resident Evil 4 Remake
How to play The Last of Us Theme Song in Tchia.
Tchia
Location of the Clockwork Castellan in Chapter 10 - Resident Evil 4 Remake
Resident Evil 4 Remake
How to Climb the Water Ramp
Star Wars Jedi: Survivor
How to Solve the Rutafu-um Shrine Puzzle in Hebra Mountains Cave
The Legend of Zelda: Tears of the Kingdom
Gorgimera Location and Abiltities Video Guide
Final Fantasy XVI
You MUST find this Elden Ring Easter Egg in Kingdom Come Deliverance 2
Kingdom Come: Deliverance II
WUCHANG: Fallen Feathers – Burning Barbarian AXE Build
WUCHANG: Fallen Feathers
Pokémon Pokopia – ALL Withered Wasteland Human Records Locations
Pokémon Pokopia
Pragmata – ALL Mini Cabin Figure Locations & Rewards
Pragmata