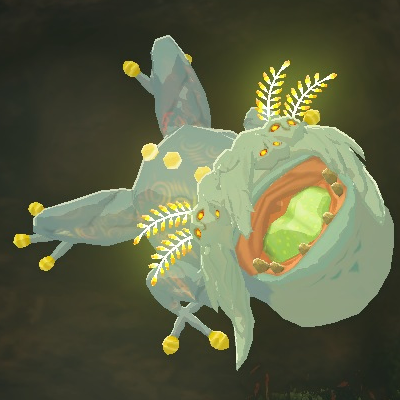
Bubbulfrog
In-game Description
These mysterious creatures dwell in caves all around the world. They like to stay hidden and will spew bubbles when threatened. When overcome, they disappear and leave behind mysterious objects.

Map(s)
 Surface
147 Interactive Map Locations


Bubbulfrog
Found inside the  Pit Cave. Destroy the boulders near the Construct NPC, and the frog will be hiding out of sight on the wall in the hidden room.

Bubbulfrog
In the  Bottomless Cave. On the wall as you climb the stairs.


Bubbulfrog
Inside the  Passeri Greenbelt Cave.
Break the rocks in the corner with a hammer type weapon to find the area with this  Bubbulfrog.

Bubbulfrog
Inside the  Sage Temple Cave.
You must break the rocks in the center of the cave to find some stairs leading up to it.

Bubbulfrog
Inside the  Ancient Tree Stump Cave.
Found at the bottom of the cave. Defeat it to obtain a  Bubbul Gem.

Bubbulfrog
Inside  North Hyrule Plain Cave, on the roof towards the back of the cave.

Bubbulfrog
Found inside the highest point of the  Ranch Ruins Cave.
It will drop a Bubbul Gem when defeated.

Bubbulfrog
Inside  Pico Pond Cave, located on the wall at the back of the cave.

Bubbulfrog
Inside the  Mount Floria Cave. On the upper floor, you’ll find a large wooden fence blocking your progress. Next to it is a breakable wall which will reveal the room, but will have thorns blocking your way.
Either get the car or use a nearby wooden barricade to climb over the thorns.
In the next room, destroy another breakable wall to find the frog.

Bubbulfrog
Inside  Meadela’s Mantle Cave. On the tunnel roof near the waterfall.

Bubbulfrog
Inside  Rospro Pass Cave.
At the far end of the cave.

Bubbulfrog
In  Mount Dunsel Cave. There are some vines you can destroy with a Bomb
  Arrow near where the two
  Shock Likes are. Continue up the path and look on the wall.
- Drops a Bubbul Gem.

Bubbulfrog
Underground, accessible via the  Ralis Channel cave further south.

Bubbulfrog
Accessible via  Cave Under Zora’s Domain, to the south.

Bubbulfrog
Accessible via  Upland Zorana Foothill Cave.

Bubbulfrog
Inside  Boné Pond East Cave. Lower section.
Enter via one of the two lower entrances.

Bubbulfrog
Inside  Lake Kilsie Cave.
Ride the air vent to its highest position, then enter the entrance with the icicles hanging towards the south (behind you).

Bubbulfrog
Accessible via  Upland Zorana Byroad.
Halfway along the byroad, there’s a side passage along the east side.
Near the end, there are some sunken ruins. Use  Ultrahand to lift the floodgate, draining the water.
Cut down the tree roots on one of the cavern walls and this sneaky frog is lurking in the chamber beyond.

Bubbulfrog
Accessible via  Upland Zorana Summit Cave.
In a cove directly above the entrance. Use  Ascend to climb up, after turning around to ascertain its position.

Bubbulfrog
Inside  Hebra Mountains Northwest Cave.
Enter the very first gap while descending the cave.

Bubbulfrog
Accessible via  Skull Lake Cave. In the
  Stalnox chamber, look for some blue-ish breakable rocks along one of the walls.

Bubbulfrog
Inside  Death Mountain East Tunnel, in a cavern halfway along the minecart track.

Bubbulfrog
Inside the  Shrine of Resurrection, shoot it to obtain a Bubbul Gem.


Bubbulfrog
Found inside the  Great Plateau Foothill Cave, break the blue rocks to reach it.

Bubbulfrog
Inside  YunoboCo HQ East Cave. At the bottom of a pit blocked by cracked rocks.

Bubbulfrog
Found inside the  River of the Dead Waterfall Cave.

Bubbulfrog
Inside  Deplian Badlands Cave, halfway between cave entrance and Minetak Shrine.

Bubbulfrog
Inside  Isle of Rabac Gallery, the entrance of which is located north-west.


Bubbulfrog
Inside  Lanayru Road South Cave, through the left waterfall.


Bubbulfrog
Inside  Deepback Bay Cave, in the cavern past
  Anedamimik Shrine.

Bubbulfrog
Inside  Lanayru Road East Cave, east from
  Jogou Shrine.

Bubbulfrog
Inside  Atun Valley Cave, on the second floor, above the pool of water. On the wall behind the breakable wall.


Bubbulfrog
Inside  Ancient Prison Ruins. Near
  Chichim Shrine, when the floor collapses.

Bubbulfrog
Inside  Taafei Hill Cave. You need to smash through some rocks to reach it. Eg. by using blunt weapons or bombs.


Bubbulfrog
Inside  Gerudo Canyon Mine (Cave), near the very top.


Bubbulfrog
Inside the  Yiga Blademaster Station. Requires completing
  The Yiga Clan Exam.
After going through the door, crouch through the gap to the right.

Bubbulfrog
Inside  Tanagar Canyon West Cave, along the left path.

Bubbulfrog
Inside  Gisa Crater Cave, in the tunnel between the two entrances.


Bubbulfrog
Inside  Akkala Citadel Ruins Summit Cave. To the south, there’s a narrow gap you can crawl through, behind some boxes.


Bubbulfrog
Inside  Eventide Island Cave. At the back of the main cave, look for a tunnel that you can swim through.

Bubbulfrog
Found inside  Ploymous Mountain Cave, climb to the ledge near the entrance and head inside to find it.

Bubbulfrog
Inside  Cora Lakefront Cave. Located at the very top of the roof of the cave.
You can Ascend near it or glide down from the hill above the cave.

Bubbulfrog
Found inside  Puffer Beach Overhead Cave, in the room with the Chest.

Bubbulfrog
Inside  Kopeeki Drifts Cave. Near the entrance, towards the left, there’s a cavern high up.

Bubbulfrog
Inside  West Lake Totori Cave. Just before
  Wao-Os Shrine, look for a high up cave on the right.

Bubbulfrog
Inside  Hebra Headspring Cave. Cavern near the left corner. You may need something to bridge the gap.
If you lack materials, you could try creating some ice platforms by using ice-based weapons/materials near the water.
Then use Ultrahand to create a bridge with them.

Bubbulfrog
Inside  Brightcap Cave. High up, on a ledge surrounded by brambles. Use Ascend.

Bubbulfrog
Inside  Oakle’s Navel Cave. Through a watery tunnel in the opposite direction of the
  Tokiy Shrine.


Bubbulfrog
Inside  North Biron Snowshelf Cave, on the roof of the lower cavern with the air vent.

Bubbulfrog
Inside  Cape Cales Cliffbase Cave. Head northwest from the ship through the water using the wooden boards in there to regain stamina. When you reach the second wooden board, look up to find the frog.

Bubbulfrog
Inside  Mapla Point Cave.
Ascend to the second floor in the first room, and the Bubbulfrog will be on the wall at the back.

Bubbulfrog
At the north entrance/exit of the  North Akkala Beach Cave.
If you came from the south entrance, it’s on the side of the stone pillar that you Ascend to escape the cave.
If you came from North Lomei Labyrinth, you need to enter the basement via the hole in the floor near the  Igashuk Shrine, then head south.
As you descend into the North Akkala Beach Cave, you should spot the frog on the side of the pillar.

Bubbulfrog
Found at the end of  Sarjon Woods Cave, at the waterfall.

Bubbulfrog
Found inside  Calora Lake Cave.
Behind a layer of breakable rocks with a bunch of explosive barrels nearby.
Ka-boom!

Bubbulfrog
Inside  West Restaurant Cave, north from the entrance.


Bubbulfrog
Inside  YunoboCo HQ South Cave. Halfway across the magma lake, look for a cave opening on the left.

Bubbulfrog
Inside  Royal Hidden Passage.
In the tall cavern with the tree roots, head north-east.

Bubbulfrog
Inside  Rebonae Bridge Cave. Above some cracked rocks in the middle of the ceiling.
You can  Fuse the
  Bomb Flowers to your arrows to destroy the rocks.

Bubbulfrog
Inside the  Ancient Columns Cave. Look for a hole on the floor around the left side.

Bubbulfrog
Inside the  Coliseum Ruins Cave. Squeeze through a gap in the wall on the right, behind some wooden boxes.

Bubbulfrog
Inside  Thundra Plateau Cave. Hidden above some cracked rocks in the ceiling. You can Fuse some Bomb Flowers to your arrows to blow ’em up.

Bubbulfrog
Found inside the  Cucco Hideaway cave.
You need to destroy the breakable rocks to the left of the entrance, then more rocks near a  Like Like.

Bubbulfrog
Inside  Sturnida Springs Cave. You need to destroy some cracked rocks to reach it. Use Bomb Flowers or weapons fused with a rock etc.

Bubbulfrog
Inside  Mount Drena Foothill Cave.
At the far end of the cave, accessible after smashing through the rubble.

Bubbulfrog
Ceiling near the center of  Crenel Hills Cave.

Bubbulfrog
Inside  Robred Dropoff Cave.
In the cavern above the  Barbarian Helm, accessible by using Ascend (you’ll also arrive here if you ascended to the wrong place earlier).
You can also reach this cavern from where the  Silver Boss Bokoblin is, if you look up above the blocked off entryway.


Bubbulfrog
Inside  Satori Mountain Cave.
After dropping down a hole, there’s a bridge with a  Blupee.
Go in the opposite direction of the Blupee.


Bubbulfrog
Inside  Whistling Hill Cave, in the middle of the ceiling of the first room.


Bubbulfrog
Inside the  Statue of the Eighth Heroine Cave.
To the right of  Tingle’s Hood, there’s a small gap you can squeeze through.
But you first need to remove the sand using a Fan.

Bubbulfrog
Inside  Dueling Peaks North Cave. Near the entrance, there’s a cave high up on the left.

Bubbulfrog
Inside  Dueling Peaks South Cave.
Behind the destructible rocks to the right after entering.

Bubbulfrog
Break through the dark rock wall to find the Bubbulfrog and claim their Bubbul Gem inside the  Oasis Source.

Bubbulfrog
Inside the  Valley of Silent Statues.
The Bubbulfrog is hiding behind the left statue (facing with the light from the statue behind you). Use the mirrors to reflect the sunlight to the left statue.

Bubbulfrog
Inside  Popla Foothills Excavation Site.
Opposite the Topaz chest, there’s a passageway if you climb up a bit.

Bubbulfrog
Inside  Kakariko Village Cave, at the endpoint.


Bubbulfrog
Inside Central Gerudo Cave.
At the base of the cave, blow up the blue breakable rocks.

Bubbulfrog
Inside  Retsam Forest Cave. On the wall at the end of the path.

Bubbulfrog
Inside the Southern Mine (Cave), behind some destructible rocks.
From the entrance, keep turning left.

Bubbulfrog
Inside  Gorko Tunnel (Cave), in a small cavern past the hidden hot spring.

Bubbulfrog
Inside  East Restaurant Cave.
Near the end of the minecart track, there’s a gap you can crawl through next to a derailed minecart.
The frog is lurking behind some destructible rocks.

Bubbulfrog
Inside  Lake Ferona Cave.
Look for some destructible rocks towards the east, just before the water.
The frog is lurking in the small cavern beyond.

Bubbulfrog
Inside the  Gerudo Sanctuary, accessible via the south entrance.

Bubbulfrog
Inside  Rassla Lake Cave, high above the
  Large Zonai Charge chest.
Easiest way to reach it is to find the lowest point to Ascend. However, there may be nowhere that’s low enough.
In which case you can Fuse a Hover Stone to your arrows and shoot them to use them as ascending platforms.

Bubbulfrog
Inside  Death Mountain Foothill Cave.
In cavern beyond the destructible rocks towards the east.

Bubbulfrog
Inside  Mount Nabooru South Cave.
In the upper cavern.

Bubbulfrog
Inside  Foothill Monster Den.
From the entrance, look for some destructible rocks on the left-hand side wall, slightly high up.
Probably easier to destroy the rocks after obtaining your equipment back.

Bubbulfrog
Found inside the  Tamio River Downstream Cave.

Bubbulfrog
Inside the  Ancient Altar Ruins.
In same chamber as the chest with the  Phantom Greaves. Drop down the sand pit marked here.

Bubbulfrog
Inside  Tarm Point Cave.
About halfway up the cave, there are some destructible rocks along the west side.
The frog is found beyond.

Bubbulfrog
Inside  Talonto Peak Cave. Above the cave at the endpoint.
You can climb up or use Ascend.

Bubbulfrog
Inside  East Biron Snowshelf Cave, at the end of the lower path.
If you entered from the west, you’ll need to head east for a bit.

Bubbulfrog
Inside the cave with the  Hebra Great Skeleton.
On the ceiling near the entrance. You may have to turn around to see it.

Bubbulfrog
Inside  Pikida Stonegrove Northwest Cave.
In the air vent cavern with the Ice Like, look for some destructible rocks halfway up.
You can destroy them by fusing Bomb Flowers to an arrow, etc.

Bubbulfrog
Inside  Tabantha Hills Cave.
At the top of a slippery slope. You can climb around it though.

Bubbulfrog
Inside  Oren Bridge Cave.
At the upper cavern.

Bubbulfrog
Inside  Luto’s Channel.
At the end of a high up tunnel on the opposite side of the river.

Bubbulfrog
Inside  South Gerudo Cave.
At the endpoint.

Bubbulfrog
Inside  East Gerudo Ruins Cave.
In a cavern behind some breakable rocks.


Bubbulfrog
Inside Reservoir Lakefront Cavern.
In a small cavern behind a barrier of tree roots.

Bubbulfrog
Inside the  Pristine Sanctum.
Near the back of sanctum, if you go left from the base of the waterfall.

Bubbulfrog
Inside Upland Zorana Mountainside Cave.
In a small cavern near the upper entrance/exit, behind some breakable rocks.

Bubbulfrog
Inside Byroad to Lanayru Wetlands.
On ceiling near north entrance/exit.

Bubbulfrog
Inside Tanagar Canyon East Cave.
From the entrance, look for some ruin walls on the right hand side.
Shoot Bomb Flowers etc. to destroy the rocks above the wall, then climb up.
In the tunnel, go along the left side and break through some more rocks to reach a cavern with this frog.

Bubbulfrog
Inside  Ubota Point Cave.
Near the treasure chest at the end, there’s a small gap in the wall hidden by the breakable rocks.

Bubbulfrog
Inside Rodai Lakefront Tunnel.
In the dark underground section, there’s a mound with a hole inside that leads to a hidden cavern.

Bubbulfrog
Inside Corta Lake Cave.
North from the entrance, there’s a bunch of breakable rocks covering air vents.
This frog is lurking high up near one of these air vents in a somewhat isolated area.

Bubbulfrog
Inside  Fort Hateno Cave.
In a small cavern behind some breakable rocks.

Bubbulfrog
Inside  Akkala Citadel Ruins Cave.
At top level of the  Horriblin den, there are some breakable rocks in a corner.
This frog is in a small cavern behind those rocks.

Bubbulfrog
Inside Lake Darman Monster Den.
At the far east end of the den, there’s a hole in the ceiling.
Ascend around the hole to find the Bubbulfrog’s lair.

Bubbulfrog
Inside  Komo Shoreline Cave.
In the cavern with Shock Likes, look for some breakable rocks need the west wall.
The frog is sleeping inside the hidden cavern beyond.

Bubbulfrog
Inside Lower Spectacle Rock Cave.
Use Ultrahand to move the boulders out of the way, revealing a hole in the ground.
The frog lurks in the cavern below.

Bubbulfrog
Inside Spectacle Rock Cave.
In the first cavern with the two  Ice-Breath Lizalfos, there are some breakable rocks behind the central pillar.
You can probably hear the frog behind the rocks…

Bubbulfrog
Inside  Death Mountain West Tunnel.
To the left of the buried Rockets etc. on the other side of the marbled rock that requires Yunobo’s charge attack to break.

Bubbulfrog
Inside  Icefall Foothills Cave.
In the first cavern, before going down, look for a thin ice sheet at the nearby ceiling.
Melt it with a  Fire Fruit arrow etc.
The frog lurks in the small cavern above.

Bubbulfrog
Inside  Hebra South Summit Cave.
In the tall cavern with no air vent, near the east entrance/exit, look for a ledge towards the north side.
It’s easier to see it from the top of the cavern.

Bubbulfrog
Inside  Ulria Grotto South Cave.
Past the blue breakable rocks.

Bubbulfrog
Inside  Pagos Woods Excavation Site.
At the end of a tunnel accessible through a hole in the ground.

Bubbulfrog
Inside  Floria River Upstream Excavation.
After solving the electricity puzzle, continue all the way to the end to find this frog.

Bubbulfrog
Inside  Finra Woods Excavation Site.
In the puzzle room, there’s a hole in the ceiling near one of the corners.
Climb up or Ascend near there to find a hidden tunnel. This frog lurks at the end.

Bubbulfrog
Inside  Lake Hylia Whirlpool Cave.
Behind the waterfall coming from the surface.

Bubbulfrog
Inside the  West Gerudo Underground Ruins.
In a side path hidden by breakable rocks.
Roughly halfway through the ruins.

Bubbulfrog
Inside  Mystathi’s Shelf Cave.
From the entrance, take a left through the hole in the wall and go around towards the back.

Bubbulfrog
Inside  Lizard’s Burrow.
Near the entrance, look for some cracked rocks high up the wall.
Lo and behold, the frog is smirking behind the rocks.

Bubbulfrog
Inside  Rauru Hillside Cave.
From the entrance, take a right towards the swampy path.
Halfway through that path, there are some breakable rocks. The frog can be found behind them.

Bubbulfrog
Inside  Stalry Plateau Cave.
On the ceiling, near some protruding rock. Difficult to miss since it’s a small cave.


No Comments